

The Design Revision Analyser is used to compare two ‘versions’ of the same design to check for significant differences or changes between the two versions. It can be used for example to help you identify what might have been changed between two revisions of a board when you find the new revision does not quite work reliably in the field.
Shortcuts
Default Keys: None
Default Menu: Tools
Command: Design Revision Analyser
Locating this option
Available from: Tools menu > Design Revision Analyser option
How to use the Analyser
Your later revision is known as the ‘Master’ document. With this document (Schematic or PCB) open, choose the Design Revision Analyser option from the Tools menu. The current design is then reported as the ‘Master’ document in the report.
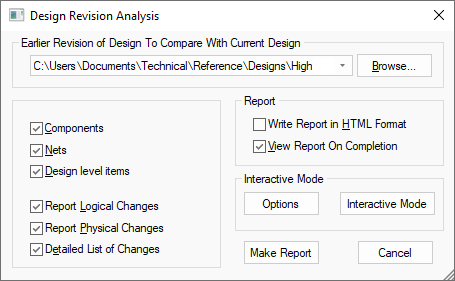
You then need to select the second document, the one to compare against. This is known in the report as the ‘Other’ document, and is expected to be the earlier revision of the design so that you can see what has been added or removed to get to the current ‘master’ design.
Choose from the options on the dialog to specify what checks should be done, and how you want the report to appear.
Make Report
The changes that are reported are shown below:
Component Logical Changes
Checks for components being added, deleted or renamed, and component values being added, deleted or modified, in the same way that Synchronise Designs does when comparing a PCB against its corresponding Schematic.
Net Logical Changes
Checks for nets (and net ‘nodes’) being added, deleted or renamed, in the same way that Synchronise Designs does when comparing a PCB against its corresponding Schematic.
Component Physical Changes
Checks for corresponding components being moved, rotated, flipped, or having a different footprint or pads in different locations, or pads with different styles.
Net Physical Changes
Checks for changes in total track length, track segment positions and width changes, total copper area, copper segment positions and width changes, via positions, via layer spans, via styles.
Design Level Physical Changes
Checks for changes to the total area of boards, the ‘segments’ of all boards, the area and segments of design level (not net) copper, and free pad positions, layers and styles.
Detailed List of Changes
If this is checked the detailed list of physical changes to segments are reported, otherwise only the length and area of changes are reported.
Using The Report
With the HTML Format check box ticked, the report is generated as an HTML (web page) file, which then opens automatically in your default web browser if you also have the View Report check box selected. This HTML report includes links between the sections to make it easy for you to browse up and down the report.
With the HTML Format check box unchecked, the report is written as a plain text file in the normal way that other reports are written, and will open in the application that is assigned on your computer to handle text files.
Inside Interactive Mode
Within this mode you can hover over items in the design to visually compare changes made to them and create a custom report.
If a modal cursor appears when hovering over an item, it means it’s either been added to or changed in the Master design. If the item has been changed, it will appear alongside a copy of it from the Other design, both in unique colours, allowing you to visually check for any changes. However, if the position has not changed, they will be drawn on top of each other, but you can set which one should appear on top from the Options in the Context Menu . If the item has been added to the Master design, it will appear in it’s own unique colour too.
You can select these kinds of changes to keep them on the screen after hovering away. Only these selected items will be reported when making a report through the Context Menu. If you hover over an item and the modal cursor doesn’t appear, it either means that the item has remained the same across both designs, or you have disabled it using the filters in Options on the Context Menu.
Note - You cannot unselect items by clicking their visual copies from the Other design. You can also check and filter through what items have been deleted from Master design, by using Comparison Options from the Context Menu and using the Layers Bar, see below for more details.
Legend
A legend is displayed within the symbol design area. This shows you colour coding for the different levels of comparison.
- Added to this version
- From this version
- From last version
Layers Bar
You can enable or disable layers and this will affect the changes you have selected. All changes on the disabled layer will be unselected and hidden, and won’t be available to be selected until the layer is enabled again.
Enabling a layer again will not automatically select the changes previously unselected. However, if deleted items are being shown then all the deleted items on the enabled layer will be automatically selected when the layer is enabled.
Context Menu Options
Whilst in the mode, you can right click and use options from the context menu.
-
Show Deleted Items - Selects and displays all items that have been deleted from the Master design. This option won’t appear if no items have been deleted, or if deleted items are already visible.
-
Hide Deleted Items - Deselects and hides all items that have been deleted from the Master design. This option won’t appear if no items have been deleted, or if deleted items have already been hidden.
-
Cancel - See below under Cancelling this mode.
-
Show All Changes - This will select and display everything that has changed.
-
Hide All Changes - This will deselect and hide everything that has changed.
-
Report Selected - Will create and view a report, exclusively based on the changes selected in the design.
-
Options - displays a dialog with options that are available when in this mode:
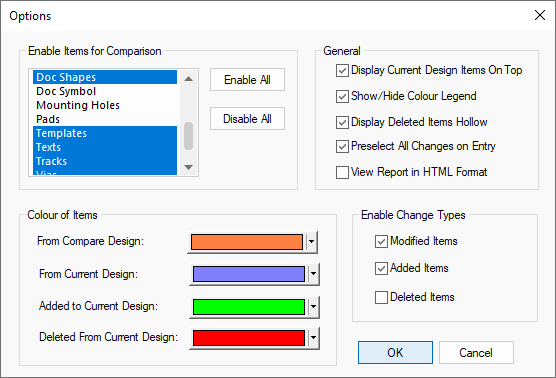
Options Dialog
- Enable Items for Comparison - All unselected item types will be blocked from being selectable in the design, to help you filter through to the most relevant changes.
- Display Current Design Items on Top - Choose if the item from the current Master or Other design should be displayed on top in the case of any overlapping.
- Show/Hide Colour Legend - Show or hide the colour legend displaying colour for the different item states.
- Display Deleted Items Hollow - Will draw all deleted items without any filling.
- Preselect All Changes on Entry - Selecting this will enable you to pre-select all changes the next time you enter Interactive Mode.
- View Report in HTML Format - Reports can be created in HTML format or as a plain text file.
- Enable Change Types - Decide what types of changes will be selectable in Interactive Mode.
- Colour of Items - Customise the colours of the different item states.
Cancelling this mode
To exit this mode and return to the Design Revision Analysis dialog, right click and select Cancel from the menu.