

The Part Browser provides a method for you to categorise parts in your libraries or vault in order to present them in an easy way to use when replacing or adding components to your designs.
Shortcuts
Default Keys: None
Default Menu: View
Command: Part Browser
Locating this option
Available from: View menu > Dockable Windows > Part Browser option
Using The Browser
If not already displayed, display the browser by using the Part Browser option from the View menu.
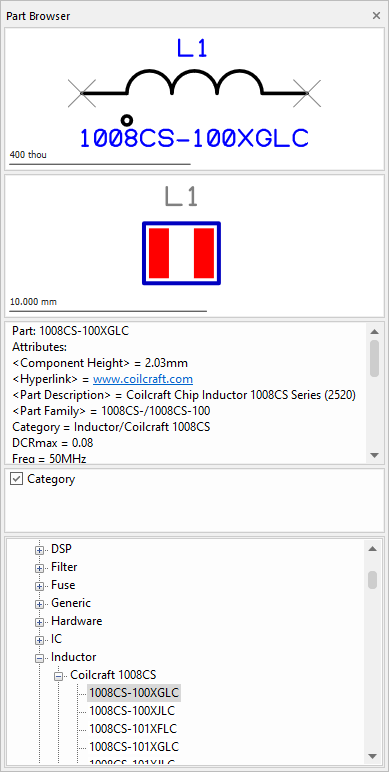
The Part Browser contains a number of panes. Drag the separators between the panes to resize them.
Preview Windows
In both the symbol and Footprint preview panes it is possible to pan and zoom in the preview window using the standard mouse wheel button functionality. Right click to use the View Symbol Extents or View Footprint Extents options from the context menu to reset the view around the whole symbol. The preview panes will show a drawing scale indicator as an aid to calculating the symbol size, showing a line and how long it is. The scale text size, font, and units used can be specified using the Display Options dialog.
Symbol Preview
The top pane displays a preview of the schematic symbol or symbols used by the Part selected in the browser pane. If the Part is a connector, only one connector pin symbol will be shown. Right click on the pane to use the Edit the Symbol in a Library option from the context menu or view it if located in the vault.
PCB Footprint Preview
The next pane displays a preview of the default footprint used by the Part selected in the browser pane. This is the footprint that will be used when the Part is added to the PCB design. Right click on the pane to use the Edit the Footprint in a Library option from the context menu or view it if located in the vault.
Attributes Preview
Attributes associated with the selected Part are displayed in the Attributes field. If the attribute has been marked as a hyperlink, this will be highlighted as a coloured and underlined link. Double clicking on this will open the chosen hyperlink in a suitable viewer, i.e. a Web browser, PDF file viewer, Word doc, etc. If you are using a vault, the vault information will also be included.
Categories List
Once Named Categories have been added using the Change Part Categories option, they will appear here in a list that can be selected. Once a category name is switched on or off, the Part tree will be updated to reflect the new selection.
Part Tree
The pane at the bottom of the dialog contains the browser tree based on the results of the categories selected. From here you can locate and select the required Part. Once selected, information about is in the browser dialog, including Symbol/Footprint previews, a list of the Part attributes, and any associated parts
Configuring the Browser
The browser presents a list of Parts in a tree structure organised according to branch attributes. The list can be hierarchical by defining more than one branch attribute, or by specifying an appropriate separator character to split the attribute value into separate branches. You can change the branch attributes used and the separator character by selecting the Change Part Categories option by right clicking on the Browser window and choosing it from the context menu.
Note: Part Categories must be defined for both the Schematic and PCB designs as they are different for each design editor.
Change Filter
Use the Change Filter option from the context menu to change the filter that is being applied to the currently selected part category in the part browser window. The Add Part Category dialog will be displayed for you to change the filter or number of pins. Only this category will be refreshed, applying the new filter.
Refreshing the Browser
Use the Refresh Parts Browser option from the context menu to rebuild the list of Parts in the browser satisfying the current category attribute. The list should be automatically kept up to date, but if the Part you are looking for is not in the list try the Refresh option before checking your libraries.
Adding Components to the current design from the Parts Browser
There are three ways of adding a component to the current design from the Part Browser using the selected Part name:
- The first method is to drag the selected Part into the design from either of the preview windows or the Part tree. You will then have a component on your cursor which you can place by releasing the mouse button. After the first component is added, more copies of the Part are interactively added to the design until you cancel the current command using the Esc key.
- The second method is to right click on the browser and use the Insert Component option from the context menu. When you move your cursor over the design window the component will appear on your cursor, like the first method.
- The third method is to use the Add Component To Bin option from the shortcut menu. As soon as you select this option a component using the selected Part name is added to the component bin.
Note, if the part is a Spice device you may be presented with a dialog to choose the device characteristics prior to adding the component.
Replacing Components in the current design
If the Part selected in the Part Browser is used in the current design, you can right click on the Part name in the tree list and use Reload From Library or Replace Part from the context menu. The appropriate dialogs will be presented to complete the operation.