The Advanced Autorouter uses a modern multipass cost based conflict reduction algorithm to find a routing solution adapting to the natural flow of the nets. Adaptive routing algorithm is the only proven approach to reach high completion rates on the modern generation of designs. This router combines speed and very high completion rates to execute its auto routing.
The Advanced Autorouter is available as a cost option to add onto your Pulsonix PCB system.
Using the Advanced Autorouter
Use this to start the Advanced Autorouter.
For this purpose you have three options available:
- Route Whole Design
- Browse Nets
- Route Selected
Shortcuts
Route Whole Design
Default Keys: None
Default Menu: Tools
Command: Advanced Router - Route Whole Design
Browse Nets
Default Keys: None
Default Menu: Tools
Command: Advanced Router - Browse Nets
Route Selected
Default Keys: None
Command: Advanced Router - Selected Nets
Locating these options
Available from: Tools menu > Auto Router > Route Whole Design
Available from: Tools menu > Auto Router > Browse Nets
Available from: Tools menu > Auto Router > Selected Nets
Route Whole Design
This will consider every net in the design as available for routing.
Browse Nets
Only nets selected from the net browser will be considered for routing. Choose the nets or Net Class from the Browse Nets dialog.
Route Selected
Only the currently selected nets will be considered for routing.
This can also be used in Latched Mode allowing nets to be automatically routed simply by clicking on them.
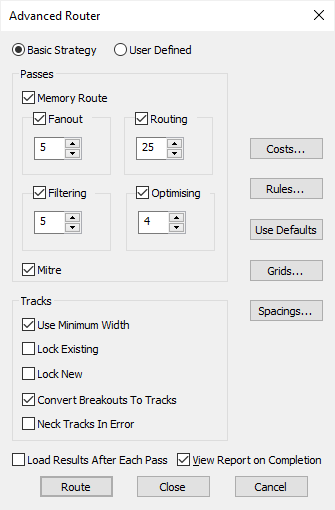
When Route Whole Design and Browse Nets are invoked the router can be started by either using Basic Strategy or User Defined Strategy mode.
Routing using Basic Strategy
This means that the router uses a predefined strategy determined by the number of passes as selected in each of the routing controls in the dialog.

Different Types of Passes
- Memory This invokes a pass that routes regular arrays of pins that have collinear connections where the pins share a common X or Y coordinate. This is effective on memory arrays.
- Fanout This invokes a number of passes that routes short escape tracks to vias from SMD pads. This can be controlled by changing values in the Rules option. You can specify the number of passes that you want.
- Routing This invokes a number of routing passes which will route either all nets in the design or the specified nets, depending on which option started this dialog. You can specify the number of passes that want. The more your design the larger number of passes that you will want to give it. If it routes to 100% before the number of specified passes then no more passes will be attempted.
- Filtering If the Routing does not achieve 100% because of crossing conflicts then these passes will try to improve the completion by removing as many of the conflicts that it can. You can specify the number of passes that you want.
- Optimising This invokes re-routing passes that attempts to reduces the number of corners, vias, off centre pad entry and more SMD pad exits on the long side. You can specify the number of passes that you want.
- Mitre This invokes a pass which changes 90 degree corners to 135 degree corners to decrease the overall length of tracks.
Any of the above pass options can be disabled by unchecking the appropriate box.
Costs
This will invoke the Costs option which can change the Cost Factors used by the Advanced Router.
Rules
Rules will invoke the Rules option to change the values that limit the number of corners, vias and conflicts that the router can use on a connection between two pins. You can also change the values that the Fanout passes use.
Use Defaults
Selecting this button changes the options, costs and rules back to their default values.
Grids
Switch to the Grids page in your Technology to view and change the current Track and Via grids used by the router.
Spacings
Switch to the Spacing Rules page in your Technology to view and change the track, via and board spacings that the router uses.
Tracks
- Use Minimum Width means that if a net has a net class defined the router will use the minimum track style as opposed to the nominal track style.
- Lock Existing Tracks means that existing routing is locked against being ripped up by the router.
- Lock New Tracks means that tracks routed by the router will become locked and will remain unaffected by the router if a subsequent routing pass is made changing the route parameters.
- Use Component Breakout Paths means that all connected but unrouted pads with a breakout, will have the breakout converted to a track before routing.
- Neck Tracks In Error Sometimes the router will route into SMD pads with the net’s net class width which is too thick to not cause a pad to track error on adjacent pads. If this option is checked then after all the routing has been done it will try to neck down a width that will not foul against the adjacent pads. The width that will be used is determined by the net class Fat/Neck rules.
Load Results After Each Pass
Select this if you want the display refreshed with the latest results after each pass.
Route
The Route button will start the Advanced Autorouter using the values specified in this dialog. Close will exit this dialog without starting the Autorouter but will store any changed values. The Cancel button will cancel the dialog without saving the selections.
Once completed, the router produces a Router Report. This shows you each routing strategy that was used, its efficiency for completion and the time it took to perform.
Board Outlines
You should only have one board outline defined in your design. If you have nested boards (a board within a board), the inner most board is considered as a cutout of the outer board and will be avoided. If you have more than one, the autorouter will give you a warning message. If you wish to constrain the router, use Routing areas.
Routing Areas
You can use Routing Areas to constrain where the router will attempt to put tracks. If these are not defined, the whole design will be routed using the board outline to restrict it.
The best way to do this is to place Areas where you do not want any tracks or vias and use Keep in Areas to manage this. These areas can be on a single defined layer, or on all layers through the board. You can use this for example to prevent the router from putting tracks near to your board fixing holes.
Pin Limits
When working with pin limited versions of the product and/or Advanced Router, the limits built into the licenses will prevent you from creating or routing a design that has too many pins.
Routing using User Defined Strategy
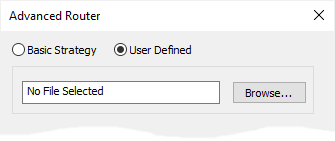
Selecting this option means that the router is driven from an ASCII command file, a DO file. This file contains a list of route, cost and rule commands which defines the strategy to use.
The commands, strategies and syntax are described on the Router Commands page.
The command file is selected by either typing the name of the file or using the file Browse button to locate the file. This will have a .do file extension.

Once the file is selected, the additional check box selections under Tracks section can be used in addition to the strategy file. Press the Route button to run the router using the Strategy file
Router Limitations
Currently, Branch Points, Advanced Net Match Spacings and Net Styles are not supported in this version of the Advanced Autorouter.
Saved in Technology
The parameters defined in this dialog are saved to both the design and as part of the technology. As such, they can be exported using Save Technology and loaded into new designs as part of a Technology file.
Related Topics
Technology Overview | Save Technology | Using The Autorouter | Costs | Rules | Grids | Spacing Rules | Router Commands | Insert Routing Areas | Area Properties | Keep in Areas | Router Report | Unroute