All toolbars, menus and shortcut keys in Pulsonix are completely configurable. You may use the Customise dialog to toggle toolbar visibility, modify the commands available on existing toolbars or menus, add your own custom toolbars or menus, remove unwanted toolbars or menus, modify or add your own Shortcut Keys and change the appearance of the application.
Any customisation that you do will be persistent, so the next time you run Pulsonix the toolbars, menus and shortcut keys will be exactly as you left them the last time you used it.
Note that by default, toolbar display is context-sensitive. When you begin editing or start a new design, the appropriate toolbars appear for the type of design you are using. This Customise dialog will allow you to display any other available toolbar.
Shortcuts
Default Keys: None
Default Menu: Tools
Command: Customise
Locating this option
Available from: Tools menu > Customise option
Using the Customise Dialog
As well as accessing the Customise option from the Tools menu, you can also right click on any toolbar or the menu bar or status bar and select Customise from the shortcut menu.

With the Customise dialog open, you may select any of the available tabs;
Other Customise operations
While the Customise dialog is displayed you are able to modify toolbars and menus not only by using the controls in the dialog itself but also by interacting with the toolbar or menus themselves.
To move a toolbar button
Drag the button off its existing toolbar and drop it anywhere over the other toolbar or menu.
To copy a toolbar button
This is the same action as moving a button, but with the Ctrl key held down.
To delete a toolbar button
Drag the button off the toolbar and drop it anywhere other than over a toolbar or menu.
Note that a toolbar button may be dragged to move or delete it at any time when the Customise dialog is not displayed by holding down the Alt key then dragging the button.
To group related buttons on a toolbar
To group related buttons, you can add a separator bar before the first and after the last button in the group to distinguish the group from other buttons on the toolbar. Use the Start Group menu option to achieve this.
To add a separator bar to the left of a button, you must have the Customise dialog displayed. Click on the button and drag it slightly to the right and release. The separator will appear on its left. Drag the button to the left to add a separator to its right.
To remove a separator bar, drag an adjacent button over it and release.
To move a menu item
The menu containing the item to be moved may be dropped down by clicking on its top menu bar item. Drag the menu item off its existing menu and over the top menu bar item for the menu to which you wish to add it. Once the menu drop down has appeared, drop the menu item at the required position.
Note that menu items and toolbar buttons are freely interchangeable and may be moved from a toolbar to a menu or vice-versa.
To delete a menu item
Drag the menu item off the menu and drop it anywhere other than over a toolbar or menu.
Grouping related menu items in a menu using a separator bar
Items in a menu may be grouped or ungrouped by using the Show Group menu option, this will add a separator bar for you. You must have the Customise dialog displayed in order to see th is option. Right click on the menu that you require the separator bar to reveal the Button dialog, then select Add Group from the menu. Drag the bar to the position required.
To remove a separator bar, drag it off the menu and release.
To change the appearance of a toolbar button or menu item
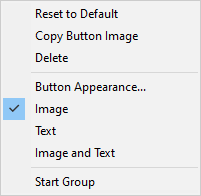
Right click on a toolbar button or menu item to popup the context menu shown below:

Use these button options to configure the appearance of the button on the toolbar or menu. The Delete option is an alternative way of removing the button. The Start Group option is an alternative method of creating groups of buttons. It will be ticked on the menu if the button has a preceding separator to define the start of a group.
The remainder of the options affect the appearance of the button and are described in more detail in the help for Button Appearance.
Note: Some toolbar buttons represent popup bars or specific parts or symbols. When right clicking on these you get a Change Name dialog instead of the button appearance menu. Use this to change the name of the popup bar or the name of the part or symbol the button represents. If you want to get the button appearance menu for these buttons you have to use the following method. In customise, drag any other command over the top of the button you want to change. When it is directly over the button, right click and the appearance menu will be displayed for the button it is over.
Quick Customisation
Using Alt+Drag
This allows you to drag and drop toolbar/menu items without invocation of the customisation dialog. Just hold down the “Alt” key and drag the toolbar/menu item and drop it at a new location.
Using the Toolbar Quick Customisation menu
Clicking the page button on a toolbar drops down an Add or Remove Buttons menu containing all buttons on the toolbar. These can then be hidden or displayed simply by selecting the menu item.
Customise Dialog Tabs
Related Topics
Workbook Mode | Status Bar | Toolbars | Button Appearance | Edit Button Image