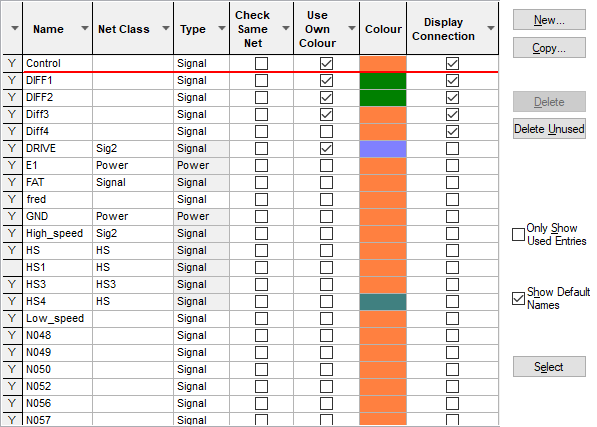
The Net Names dialog allows you to define the names to be used on Nets. You can define the these names in a Technology File, which can then be used when the net is created.
For example, you may want to predefine the Net Names for power signals. By associating the Net Name with a Net Class you also have the possibility of adding Net Class Attributes, and in PCB you can also predefine the default Track and Via Styles for the Net.
The Net Items page provides an overview of all the net styled items in Pulsonix. This enables you to see the differences and to assess their use for your required usage.
Shortcuts
Menu: Setup
Default Keys: T
Command: Technology
Locating this option
Available from: Setup menu > Technology option > Net Names tab
Using the dialog
On selection, the Technology dialog opens, select Net Names. The existing Net Names for the Technology being used will be presented.

By right clicking in the grid, you can select Advanced View from the context menu. This opens the grid to expose attribute rules and matches:

Navigation
The buttons to the right side of the dialog are used to navigate the grid, the general common buttons are detailed on the Technology Navigation page.
When using Copy, a new Net Name is created with a name of the form ’
The Show Default Names check box is selected if you wish the Net Names list to include any default Net Names in the design
You can select multiple rows by dragging or Shift and clicking. Once you have done this, you can use right click on a cell to bring up a context menu which contains options such as Apply to all selected cells - this enables you to copy a cell value to the same column cells in the selected rows.
You can also select rows using the Select button on the right of the dialog. This brings up a small
dialog which enables you to select Net Name rows using a Wildcard match on an attribute.
The Wildcard Wizard is available using the small
icon next to the Match entry: ![]()
Using the column filters
Filters can be set on the column headers, which allows you to refine your columns. being shown to be refined. The options available are described in more detail on the Grid Navigation page.
Context menu options
Right clicking in the grid will display a context menu that changes slightly depending on the cell selected. The options available are described in more detail on the Grid Navigation page.
Using the editing pane

Net Name
If creating the Net Name in this dialog, use the New button to create a new Name by typing the name required. If the name has been created in the design or translated from the schematic design, you can edit it here.
Net Class
If you are using Net Classes in your design or the design has been loaded in from an older version of Pulsonix you can edit or create a new Net Class for this Net.
Type
If the net name has been created in the design and not in this dialog, the Type would have been defined by you. If creating the Net Name in this dialog, you should define what type the net will be. Choose from the three options available in the drop down list. This list is hardwired by the system.
Check between items on same net
Check between items on same net makes the Design Rule Checker apply the spacing rules between items on the same net. This means that there will be an error for pads, tracks or vias on the same net if they inhibit the spacing rule set. Only tracks which connect directly to a pad or via are allowed, a DRC error will be reported if a track that connects to a Pad has a corner segment outside of the pad that is within the spacing rule region.
Guard Spacing
A Guard space can be used if you require a general extra spacing on a net and the items associated with it, such as pads, vias etc. Older Pulsonix designs may have used this feature but it is no longer required. Instead, use a spacing rule to define precise spacings required.
Own Colour
Use Own Colour enables you to highlight the net using it’s own colour.
Force Display Connections
When Connections are switched off in the design, selecting the Force Display Connections check box will force this net to be visible.
Select
Using this button allows you to create a match of net names in the grid based on different criteria using the dialog, such as Net Name, Net Class or Net Type.

You can then use Apply to selected cells on the context menu, to, for example, set the colour of all nets with a matching attribute.
Units
The Units button allows you to locally switch between Metric and Imperial units whilst in this dialog. Once the dialog is closed, the units revert back to the original design units. If switching to different units to the design units, the value typed will be converted when you next enter this page.
Rules and Attributes
Any rules or Attributes defined for the Differential Pair or Differential Pair Chains will be show here. Use the Add, Edit and Delete buttons to add or edit extra rules or attributes. More information about editing these fields can be found on the Rules and Attributes help page.
Related Topics
Technology Overview | Net Items Overview | Net Class | Technology File | Rules and Attributes