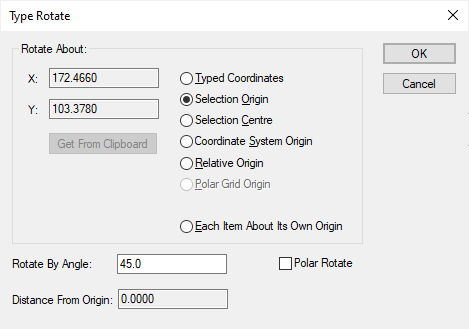
During Select Mode or when placing items, it is possible to rotate the current selection relative to its original position by typing into a dialog. It can also be used to rotate each individual item about their own item origins.
Shortcuts
Default Keys: None
Default Menu: None
Command: Type Rotate
Locating this option
Available from: Context menu > Type Rotate option
Using the Dialog
From the shortcut menu, using the Type Rotate command brings up the following dialog allowing you to specify the rotation origin and angle to rotate by.

Rotate About
Use this section to specify the X and Y coordinates of the point you want to rotate the selected items about. Choose Type Coordinates to enter your own values, or pick one of the radio buttons to set the rotation origin to a known position. If typing your own coordinates the values will be remembered and presented next time you use the dialog, allowing you to easily perform several rotations around the same point.
Choose Each Item About Its Own Origin if you want rotate each of the selected items (apart from tracks and connections) about their individual origins rather than rotating the selection as a whole.
Get From Clipboard
This button is enabled if you are using Type Coordinates and the clipboard contains a text item that includes a coordinate. If pressed the coordinate X and Y values will be placed into the appropriate edit boxes.
Rotate By Angle
With Polar Rotate off, use this control to type the angle in degrees you want to rotate the selected items by. A positive angle will rotate anti-clockwise, and a negative angle will result in a clockwise rotation.
Distance From Origin
The Distance From Origin field is just information to show the radius of the rotation.
Polar Rotate
With the Polar check box selected, the Rotate By Angle and Distance From Origin boxes change to Angle and Magnitude.

These two fields are used to define the position of the selected items using absolute polar coordinates applied about the rotation point. The selected items will be rotated about the rotation point until their origin is at the required angle and then moved towards or away from the origin until the distance from the selection origin to the rotation point is equal to the required magnitude.
Selection Types
There are additional check boxes that drive how the selection will be acted on:
Typed Coordinates - with this checked, the X and Y fields will be available, this enables you to type the rotation origin.
Selection Origin - with this checked, the selection origin will be used as the rotation origin.
Selection Centre - this will use the centre of the selection as the rotation reference point.
Coordinate System Origin - this will use the Coordinate System Origin as the rotation reference point.
Relative Origin - this will use the Relative System Origin as the rotation reference point.
Polar Grid Origin - this will use the Polar Grid Origin as the rotation reference point.
Each Item About Its Own Origin - This will rotate each of the selected items (apart from tracks and connections) about their individual origins rather than rotating the selection as a whole. This is useful where footprints in the library have been changed and they should be rotated in the design after an update.
Type Rotate in the Footprint Editor
In the Footprint Editor, you can also use Type Rotate and select the Symbol Origin from the dialog as the rotation reference point.

Using the Type Rotate option
If used whilst moving items, the rotation is applied to the selection in its original position. The exception to this rule is when you are adding the first instance of a new item, that does not have an original position. The presence of an original position is indicated during move by the delta coordinates shown on the status bar.
By rotating relative to the original position you can position subsequent added items rotated relative to the previous item added. Also if you are using Duplicate, Paste or Apply Layout Pattern you do not have to use Cancel Move before rotating the items into position.
Using Type Rotate during Apply Layout Pattern allows you to take a copy of a section of the board that has been positioned and routed to fit into a segment of a circle, and to repeat the pattern in other segments of the circle.
Rotating About A Picked Point
If you want to rotate a set of selected items about a point defined by another item already in the design, use the Rotate About option from shortcut menu when in Select Mode. This will enter Rotate One Step latched mode operation and immediately let you place the origin defining the rotation point. This origin can be snapped to any design item, including construction line intersections. Once the origin is placed, use left click anywhere to rotate the selection about it by the rotation step. Subsequent left clicks will repeat the rotation. You can change the rotation step whilst in this mode using Change Rotation Step from the shortcut menu.
Related Topics
Apply Layout Pattern | Place Selection Rotate About | Select Mode | Type Coordinate | Units