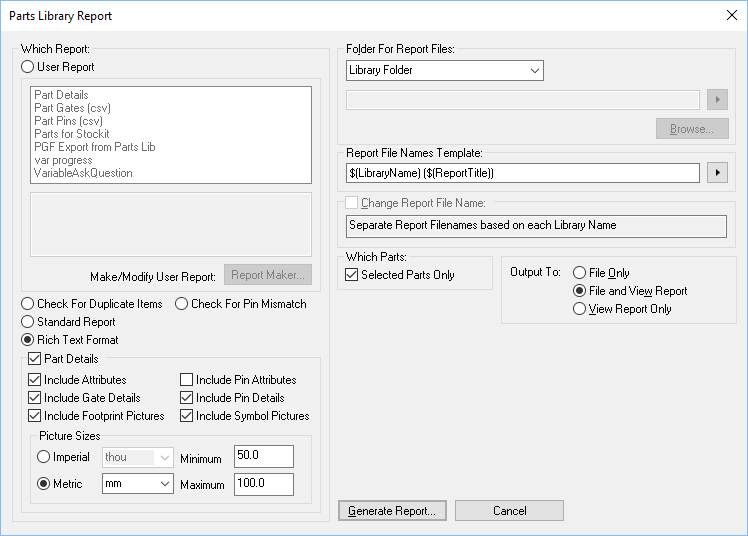
This command is available from the Part Library Manager dialog. It enables you to a get a report of the parts in a library and you can specify whether to use your own tailored User Report, the Standard Report, or the Rich Text Format Report.
Locating this option
Available from: Setup menu > Libraries > Parts tab > Report option
Using the Report option

User Report
Check this button to choose from the formattable reports (reports generated by Report Maker format files) applicable to the Parts Library. Double-click on the required report to generate it, or select it and use the Generate Report button at the bottom of the dialog.
Below the list of report names is a box that shows a description of the currently selected report. Click on one of the reports in the list to see its description and the name and location of the report format file.
Report Maker - Click on this button to use the Report Maker to create or modify a User Report. New reports created will be automatically added to the list in this reports dialog.
Check For Duplicate Items
This will scan all currently enabled libraries, looking for any items that appear more than once. This report can be used to find all those library items where you may have placed your own item ‘ahead’ of the same named items in other libraries further down the search order.
Check For Pin Mismatch
This looks at the expected pin count of a Part and finds and checks against the pin counts on the Parts’ Footprints and Schematic Symbols to look for a mismatch. This takes into account Connectors typically having a single pin symbol for all its Parts. It will also inform you if it simply cannot find the Symbol or Footprint the Part references.
Standard Report and Rich Text Format Report
You can choose between the Standard Report and Rich Text Format Report options using the appropriate check boxes. Only one or the other can be chosen at any one time.
The Standard Report enables you to get a built-in report of the Parts in a library. You can use the check boxes in the Part Details section at the bottom of the dialog to specify whether you need Details of the contents of the part and if you do whether to include attributes.
The Rich Text Format Report enables you to get document your parts library with full graphical pictures of Symbols and Footprints as well as the Part information attributes. You can check the Details button to report the contents of the Parts.
Part Details
If this option is enabled then details of the part is included in the report. This includes Schematic Symbols (and representations) and Footprint used by the Part. Also, if the Part defines a group of parts, then the other Parts in the group are listed.
Include Attributes
If this option is enabled all the Attributes defined in the Part are listed along with their values.
Include Gate Details
If this option is enabled the gates on a Schematic Symbol will be presented in a tabular format that is similar to how it is presented in the Part Editor.
Include Footprint Pictures
If this option is enabled each footprint that is used by the Part will drawn as close to the real life size of the footprint as possible.
Include Pin Attributes
If this option is enabled all the attributes defined in the part pins are listed along with their values.
Include Pin Details
If this option is enabled the pins that are not part of any gates will be presented in a tabular format with physical and PCB names included.
Include Symbol Pictures
If this option is enabled each symbol that is used by each representation of the Part will drawn as close to the drawing size of the symbol as possible.
Picture Sizes
This enables the Minimum and Maximum sizes of the graphics to be specified, this ensures picture are neither too large or too small.
The Imperial and Metric controls allows you to specify the units that the minimum and maximum are specified in.
Folder For Report Files
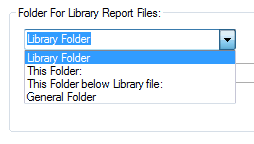
This section defines where the library report files are written when generated from this dialog. You can choose from four different settings by selecting from the drop-down list.

- Library Folder : report files will be written to the same folder as the library file itself. If the report is for all libraries it will be written to the general folder. (See General Folders).
- This Folder : you specify the folder where all library report files are written. Either type the required folder path, if you type a relative path it will be applied to the current working directory, or use the Browse… button to use an explorer dialog to choose the folder. You can use the pop-up menu to the right of the folder name box to insert keywords that will be replaced with the correct text when the report file is generated. These keywords are explained in the Library Report File Names Template section below.
- This Folder below Library file : you specify a folder name which will be appended to the folder in which the library is stored. For example, if your library is stored in “C:\My Projects\Board 6\Local.pal”, you can set the reports folder name to “Reports” and all the library report files will be written to the folder called “C:\My Projects\Board 6\Reports”. If the report is for all libraries it will be written to the general folder. (See General Folders). You can use the pop-up menu to the right of the folder name box to insert keywords that will be replaced with the correct text when the report file is generated. These keywords are explained in the Library Report File Names Template section below.
- General Folder : Use the folder defined in the General Folders dialog. The name of the General folder pre-defined will be shown greyed out as not selectable in the box.
Report File Names Template
This section defines how the library report file names are constructed. You can type fixed text into the box, and use the drop down menu button to the right of the file name box to insert keywords that will be replaced with the appropriate text when the report is run. The first set of keywords, above the menu dividing line, are only inserted once and therefore show a tick on the menu when inserted. Click on an inserted keyword in the menu to remove it from the template. The keywords below the line can be added multiply and so do not show a tick when inserted and have to be removed by editing the template. The keywords you can use are described below:

-
Library Name : The name of the library the report is being generated for. If the report is for all libraries, the name “AllLibraries” will be used.
-
Report Group : The name of report group that the report is in. User Reports can have a report group assigned by including the Set Report Group command in their script. Other types of reports will be in a group. If the report being run is not in a group this keyword will simply be removed from the file name.
-
Report Title : The title of the Report.
e.g. “Part Details”
-
Date and Time - The Date or Time when the file is produced. The format used is the short form of the system time format, but with all special file path characters replaced with a dash character.
-
Start Pre-Text and End Post-Text: Most keywords are obvious, but the ”$(PRE)” and ”$(POST)” keywords are a little different. They are used to add text either side of another optional keyword, but only if it is not blank. So if the optional keyword has a value then the text between the pre-text keyword and the optional keyword will be included and the text between the optional keyword and the post-text keyword will be included. If the optional keyword results in blank text the pre-text and post-text keywords, and all text between them, will be removed from the filename.
For example ”$(PRE)[$(ReportGroup)]$(POST)” will be replaced by “[parts]” for a user report that has group “parts” and will produce nothing for a report with no report group.
-
If Then Else: There is also a set of advanced keywords that can be used to create conditional folder and filename templates. See the Design Reports help for more details on these keywords.
Note: If you have selected a report in the list and are not using Change Report File Name then the file name with the keywords replaced will be shown in the file name box.
If the template is for a file name rather than a folder, all folder path special characters will be removed from the name when the template is applied.
Change Report File Name
This shows the name that the report will be written to. Check the box if you want the report file to be a specified name.
If you leave the file extension off, the default report extension will be added. If you just type a file name with no directory, the above mentioned reports folder will be used.
Leave unchecked to use the above mentioned default report name. The file name and location where the report will be written are shown. If the name is too long for the box, hover over it to see a tooltip window with the full name.
Which Parts
By checking the Selected Parts Only, if you have any Parts selected in the Part Library Manager Contents box, then the reports will report only those Parts. This is only available for a User Report.
Output To
Choose whether you want the report to be saved to a file and if it is to be viewed now.
-
File Only - Saved to file, but not viewed via editor.
-
File and View Report - Saved to file and viewed using Notepad or the editor associated with this type of file.
-
View Report Only - The report is viewed using Notepad or the editor associated with this type of file. A file is produced but there will be an attempt to delete it after running up the editor.
Note: Some editors keep the file open, for example Word used on a Rich Text Format Report. In this instance, it can not be deleted.
Related Topics
Part Library Manager | Folders - Library Reports | Report Maker