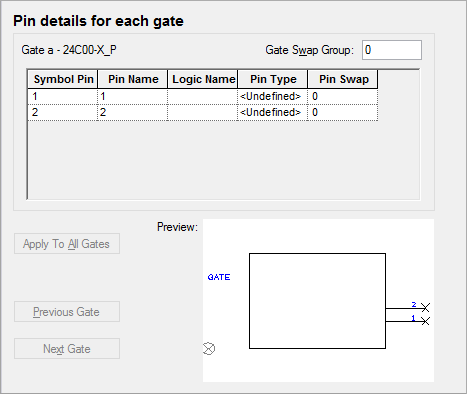
This page is used to define the properties of each of the pins on each gate in the part.
How to Use This Page

The grid shows the pins for one gate at a time. The gate name and the symbol name are shown above the grid to help you track which gate you are working on. Press Previous Gate and Next Gate to move between gates of the part. When on the first gate, use the Apply to All Gates button to copy the settings for the pins on this gate to all other gates on the part. You can also invoke Apply to All Gates by right clicking on the grid of pin details.
The values presented in the grid can be edited directly.
Symbol Pin is the pin number on the Schematic symbol itself. This field cannot be changed.
Pin Name: Select the PCB pin number from the list provided (all pin names are numeric in the part wizard).
Note: there is a shortcut to creating a part for new PGA/BGA components that use alphanumeric pin names. To do this, use the Footprint Wizard to create your new footprint, and then select “Create a Part” on the Finish page. This will automatically name the pins according to their row and column positions.
Logic Name is where you can specify a name to describe the logical function of this pin. For example, the two input pins of an AND gate may be labelled A and B, and the output pin Y.
Pin Type specifies the type of this pin. Choose the required pin type from the drop-down list:

You can also right click on a defined pin type in the grid and use Apply To All Undefined from the context menu to copy that pin type to all other pins that do not yet have a type assigned.
The pin type will be used for Electrical Rules Checking on a Schematic drawing.
Pin Swap specifies the swap group to which this pin belongs.
Preview
This shows a picture of the current gate. Use it to graphically check that it contains the correct pin numbers.
Part Wizard Pages
Start | Type of Part | Part Details | PCB Footprints | Power and Ground Pins | Schematic Symbols | Attributes | Finish
Related Topics
Electrical Rules Checking | Footprint Wizard | Gate and Pin Swapping | New Part