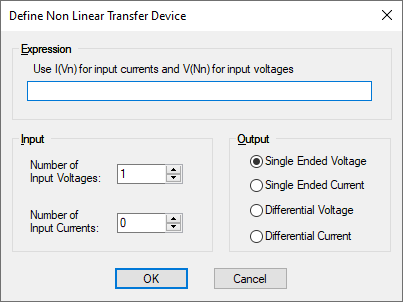
Use this when editing a Part to define the Part as a Non-Linear Transfer device.
Use this on a Non-Linear Transfer component in a schematic design to change its parameters, or to replace it with a part using a different Non-Linear Transfer definition.
These parts are implemented by using Functional Modelling. They have their Spice Type Built-in Function set to Non-Linear Transfer.
Shortcuts
Default Keys: F7
Default Menu: Simulation
Command: Edit Spice Value/Model
How To Add A Non-Linear Transfer Device
There are various ways to add a Non-Linear Transfer device to a Schematic Design:
- From the Parts toolbar, click on the Analog Behavioural icon to display the toolbar. Click on the Non-Linear Transfer button.
- From the Parts Browser, click on Spice Category, then on Analog and Behavioural to display the Analog Behavioural parts. Drag the Non-Linear Transfer part name into the design. Note: This method will only work if you have changed the part categories to select Spice Category. See Part Category and Configuring the Browser for how to change this to the Spice Category.
- Use Component from the Insert menu to add the Part called Non-Linear Transfer from the SPICE library.
Whichever method is used, you should be presented with the Define Non-Linear Transfer Device Dialog described below. This works because the part named “Non-Linear Transfer” has a blank function definition which forces the dialog to be given to get the required definition from you.
How To Define Non-Linear Transfer Device
In a Schematic Design, select the Non-Linear Transfer device(s) that you wish to change. Press F7 or use the Edit Spice Value/Model option from the Simulation menu, or from the shortcut menu.
From a Parts Library edit the required Part. Press the Edit Spice button on the Details tab. Make sure the Built-in Function is set to Non-Linear Transfer and press the Edit Definition button.
In both cases the following dialog will be displayed:

Number Of Input Voltages
All voltage inputs are single-ended, so the Symbol will require one pin for each voltage.
Number Of Input Currents
All input currents are differential, so the Symbol will require two pins for each current.
Outputs
Choose the required output configuration.
Expression
Specify an equation relating the output to the inputs.
In the equation, currents are referred to by the label “I(Vn)” where n identifies the actual current input. 1 is the first (top most on the symbol), 2 is the second and so on. Voltages are referred to by the label “V(Nn)“. Again n identifies the actual voltage input in the same manner as for current.
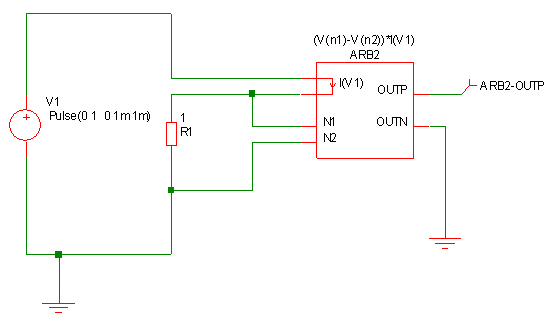
For example, the expression “(V(n1)-V(n2))*I(V1)” multiplies a voltage and current together. This could be used to monitor the power in a two terminal device as shown in the following schematic.:

In the above, ARB2 is the Non-linear Transfer device. ARB2-OUTP will carry a voltage equal to the power dissipation in R1.
Changing the Symbol
If editing a Part, make sure the chosen Inputs and Outputs values match the Symbol that is used by the Part.
If editing a component in a schematic design, pressing OK with changed Inputs or Outputs values will force the component to be replaced with a Part from the Library that matches the new specification. If no suitable Part exists, an error message will be given giving details of the Part that will need to be created.
Editing Multiple Components
If any of the fields are set to
The same applies to Radio Buttons, where no button being set indicates the components have different values for this field.