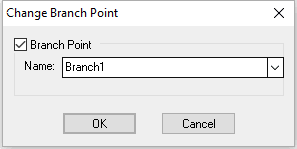
Change Branch Point is used to change the name of a branch point already inserted into a design.
Also used to change an existing via to be a branch point. If a via is a branch point it will have a name and can be used when defining signal paths and differential pairs.
Shortcuts
Default Keys: None
Default Menu: None
Command: Change Branch Point
Locating this option
Available from: Context menu > Change Branch Point option
How to Change a Branch Point
Whilst in Select Mode or Edit Mode, select a Branch Point or Via. Right click the mouse to show the shortcut menu and select the Change Branch Point option from it. The following dialog will be displayed:-

Branch Point Check Box
This is only visible if the selected item is a via. Use this to make the via a branch point. Uncheck the switch to make the via not a branch point.
Branch Point Name
If the item is a branch point, use this field to change it’s automatically allocated branch point name. This name must be unique within the design and you will be warned if you try to apply an already used name.
The stem that is used when allocating a unique name, “Branch” in our example, is taken from the Branch Point Defaults in Design Settings (found on the Setup menu)..
Related Topics
Insert Branch Point | Select Mode | Properties - Branch Points | Branch Point Defaults