Use this option for adding a Star or Delta Point symbol to a Schematic or PCB design from a documentation symbol library. This is used to join two or more related nets together at a single point in the design at the same time leaving them separate in the netlist.
Shortcuts
Default Keys: None
Default Menu: Insert
Command: Insert Star Point
Locating this option
Available from: Insert menu > Star Point option
Star Points in SCM and PCB Designs
In the PCB design, this is a single pad documentation symbol and the nets are physically joined to the pad. Errors between the track segments (on different nets) directly attached to the pad are ignored when performing a Design Rule Check, in all other places the nets must remain separate.
On the status bar, the list of nets is shown in the
name range format.
Using properties
will also show you the list of nets connected by the Star Point.
The
In the Schematic Design you can choose to use a single pin documentation symbol like in the PCB design, or use a multiple pin documentation symbol that shows the pins being joined using symbol outline.
Star Points added in the Schematic are transferred to the PCB, and Synchronised.
How To Insert A Star Point Symbol
- Select the Star Point option on the Insert menu, or use one of the above mentioned shortcuts.
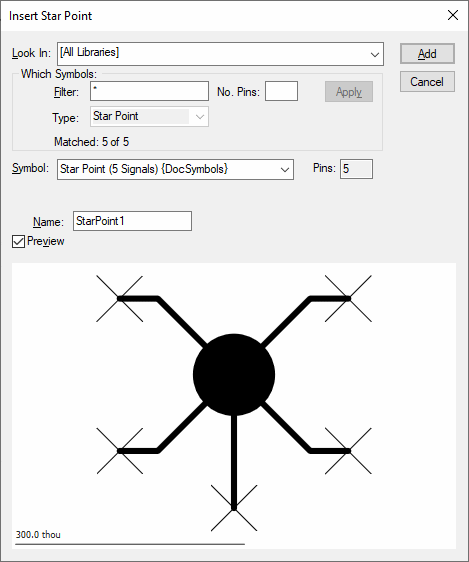
- Setup the Insert Star Point Dialog:
- Set which documentation symbol library you wish to add from.
- A list of start point symbol names will appear in the dialog. Choose which symbol you wish to add from the list. You can preview the symbol to check if it is the correct one.
- Use the Add button to add the Star Point to the design.
- Using the mouse, move the Star Point to the desired position and click to place it into the design.
- Continue to add Star Points. Press the Esc key, or Cancel using the shortcut menu, to return to the dialog.
How To Use The Insert Star Point Dialog

Look In
Use this to choose a Documentation Symbol Library to search for the required symbol. The library list is set up in Library Folders in the library manager. Two special entries exist:
Use [All Libraries] to choose from symbols in all of the documentation symbol libraries. If the same symbol is in more than one library, the first found will be used, so library order is important.
Use [Current Design] to choose from the documentation symbols already added to the design.
Which Symbols
Use the Filter box to enter a string containing the ”*” or ”?” wildcard characters to filter the list to only matching names e.g. “A*“. Use the No. Pins box to limit the matching symbols to those of a set number of pins (blank means any pin count). press Apply to alter the list of names accordingly. The number that matched the filters is shown in the dialog.
Symbol
This listbox contains the symbol names to choose from. Select the one required. The number of pins on the selected symbol is displayed in the Pins box.
Preview
Use this to optionally display what the symbol will look like when added to the design.
Interactively Positioning A Star Point
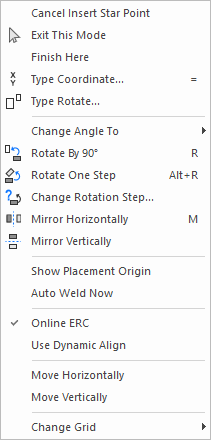
Whilst using the mouse to position the Star Point you can use the shortcut menu (shown below) to change its angle and mirror it, amongst other things. All these operations are explained in detail in the Move operation. Note: Online DRC and Display Clearance are only available when adding Star Points to a PCB design.

Use Cancel Insert Star Point to cancel the current symbol being added and return to the dialog.
or
Use Exit This Mode to cancel the current symbol being added and exit back to Select Mode.
or
Click to drop the Star Point symbol at the required position. If you are using the Auto Weld on Drop feature, enabled in the Options dialog, and a pin is on top of another pin or track end then the Star Point will be added to the existing items net. See Move for more details.
Using Star Points With The Autorouter Option
When used in conjunction with the Autorouter option, you must stub route any connections by hand to the Star point first (add a small track segment and via). Then in the autorouter dialog, select the Fix Existing Tracks option. The router will then route to the stub route segments. The Autorouter will not automatically route to Star points without doing this first.