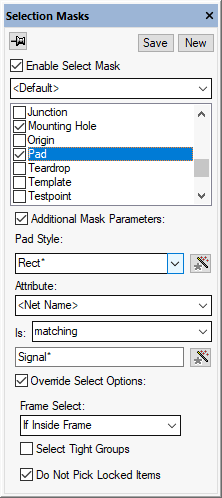
The Select Mask dialog allows you to specify a mask to control what items are selected when clicking and using frame select in Select Mode. Enable a named mask to use it instead of the normal “Selectable” settings in the Colours dialog pages.
You can use it to select items that have specified attributes, or use specified styles.
Masks can be named and saved in the registry, or exported to a file.
Shortcuts
Default Keys: None
Default Menu: View
Command: Select Mask Bar
Locating this option
Available from: View menu > Dockable Windows > Select Mask Bar option
The Select Mask Dialog
 | This modeless dialog is displayed as a configurable Dockable Window containing a set of controls to use to control selecting items in the current design. This includes a list to choose the selection mask that is to be used, and list for choosing which types of item can be selected, a set of controls for selectively filtering the set of items listed, and some options to control the how the selection is applied. |
To Show/Hide the Select Mask Dialog
From the Main Menu, under View, select Select Mask Bar to toggle visibility of the Select Mask window.
There are some buttons along the top of the dialog which allow you Save the current mask being edited to the registry, and to create a New named select mask. When creating a new mask you can choose to copy the current mask, or create a new mask with all categories selectable and no filter conditions.
Select the current mask you wish to use or edit from the dropdown list of masks previously created and saved
to the registry. The details of the selected mask will be presented in the dialog. Note the mask called
"
To activate the current Selection Mask and start to use it, select the Enable Select Masking check box. Without this selected, the normal “Selectable” settings in the Colours dialog pages are used.
Editing A Select Mask
Choose the item types you wish to select
Use the list control to check the boxes of the categories of item you wish to be able to select. To help with this, right click to use the Enable All and Disable All options on the context menu for the bar.
Double Clicking a category
Double clicking a category name within the Select Mask Bar will disable all currently selected categories and only select the category which was chosen.
Set selection conditions for each item
Select an item type in the list and the additional condition controls will appear underneath the list box. Check the Additional Mask Parameters box to enable use of these controls to set conditions on the selection of that type of item.
Some item types have style name dropdown lists. Choose a style name from the list to only select items that have that style, or leave it blank to select any styles. You can use wildcards here, for example use “rect*” to select only pads that have a style beginning with “rect”.
Some item types have attribute controls. Choose an attribute name from the list to only select items that have that attribute, or leave it blank to not use attribute matching. Next use the Is drop down list to select the type of test to apply to the attribute value. Then, if the test requires a condition, in the remaining edit box type in a string representing the condition to test against. You can use wildcards in the attribute name. If the item does not have an attribute and it is part of a component or net then the component and net will be used to satisfy the attribute condition.
Override the Selection Options
You can override some of the Select Options that are used when selecting items using the current mask. To do this check the “Override Select Options” box and the select controls will be enabled.
Use the Frame Select dropdown list to choose which items are considered for selection with the defined frame, or selection polygon in the design.
Select Tight Groups, when checked causes all items in a tight group to be selected when any one of the items is selected. When not checked, the group is only selected it you attempt an operation which would otherwise destroy the relative positions of the items in the group.
Do Not Pick Locked Items when checked, locked items will not be pickable in Select Mode.
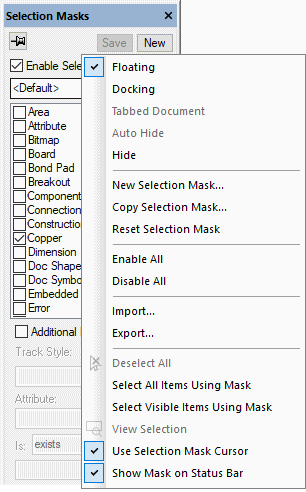
Using the Context Menu

The first section contains commands described in the Dockable Window help pages.
New Selection Mask
Use this to display a dialog to create a new selection mask. If the current mask has been changed you will be asked if you want to save it before creating the new mask.
New Selection Mask
Use this to display a dialog to create a copy of the current selection mask to a new name. If the current mask has been changed you will be asked if you want to save it before copying it.
Reset Selection Mask
Use this to reset the current mask to its last saved state.
Enable All and Disable All
Use these commands to change all of the check boxes in the item type list to the chosen value.
Import
Use this to import a selection mask from a file previously exported. This will display the standard open file dialog for you to browse to the folder containing the required selection mask file. The chosen mask will be loaded and its name taken from the file name.
Export
Use this to save the current selection mask to a file. This will display the standard save file dialog for you to browse to the folder to contain selection mask file. Use this if you want to give a copy of one of your masks to another user.
Deselect All
Available to clear the selection in the design.
Select All Using Mask
Selects all items in the design that match the current selection mask.
Select All Visible Using Mask
Selects all items in the design that are visible and match the current selection mask.
View Selection
Available to change the zoom level to just see the selected items in the design.
Use Selection Mask Cursor
Enable this to use a modal cursor in Select Mode to indicate when a Select Mask has been activated. Disable it to always show the standard cursor.
Show Mask on Status Bar
Enable this option to show the current selection mask on the Status Bar.
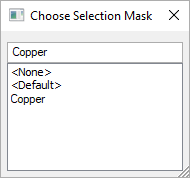
To use this, double click on the mask name on the status bar to use a simplified resizable dialog to choose which
mask to use, or to choose

There is also a command Choose Select Mask that can be assigned to a key to pop up this dialog at the current cursor position.
Switching to other dockable windows
The next section contains a list of other dockable bars that you may wish to use. If you click on one of these, it will join the Find Bar in its dockable area using a tab at the bottom of the window. This allows you to use a dockable area for more than one bar and tab to the bar you wish to use.