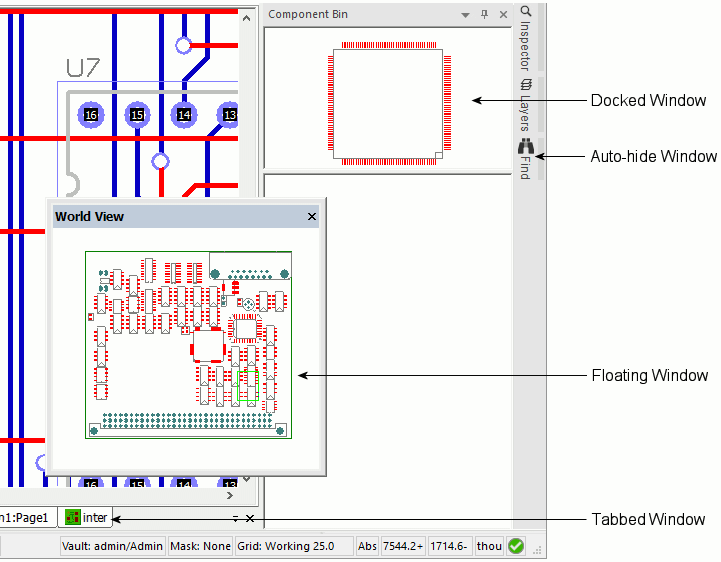
Some of the features available in Pulsonix open additional dockable windows; examples include the Component Bin and the World View. Dockable windows are completely configurable with regard to their size and position on screen and have three display modes: floating, docked or auto-hide.
In floating mode, a window has a title bar with a close button and can appear anywhere on your screen. A floating window is always on top of all other windows.
In docked mode, a window is fixed along any one of the four borders of the main window, thus not obscuring any of the design area, and will have a title bar with Pin and Close buttons across the top.
In auto-hide mode, a window is hidden away and is represented by a button in the adjacent border. The window automatically slides in and out of view when the mouse is moved over the button. This allows additional information to be displayed only when needed without permanently occupying more screen space.
In addition, tabbed windows allow multiple dockable windows to be grouped together in a single ‘container’ saving screen space and allowing them to be manipulated as a single window. The visible window is switched by clicking the appropriate tab.

To show or hide a docking window
- To toggle the visibility of a dockable window, click the name of the window on the View menu.
- Alternatively, right click on the Menu bar, Status bar or any Toolbar then click the name of the window on the shortcut menu to toggle its visibility.
- To hide the window, click the Close button in the corner of the window. This button may be at the upper-left or upper-right corner, depending on the position of the window.
Note: Some docking windows are only relevant to certain types of design and will only be visible when that type of design is active. For example, the Component Bin window will only be visible if a PCB or Schematic design is active.
To change a docked window to a floating window
Double-click in the window title bar or border, or press and hold down the left-hand mouse button then drag the window from its docked position.
To dock a floating window
Double-click the window title bar to return the window to its previous docked location, or point to the title bar and press and hold down the left-hand mouse button. Drag the frame to the desired dock position. The rectangular frame will deform while dragging to reflect potential dock positions.
| With some Application Look settings, docking indicators as shown right, appear to show the potential dock positions which can then chosen by releasing the drag with the mouse pointer over the appropriate indicator. |  |
To reposition a docked window
Press and hold down the left-hand mouse button on the window title bar border and drag the window frame to the desired docking position.
To position a floating window without docking it
- Point to the title bar of the window.
- Hold down the Ctrl key and press and hold down the left-hand mouse button to drag and position the window over any dock area of the main window. If docking indicators are shown, avoiding them is sufficient to avoid docking.
To resize a floating window
- Point to any border or corner of the window frame.
- Press and hold down the left-hand mouse button to drag the rectangular frame to the desired size.
To resize a docked window
- Point to any inside border of the window frame. The cursor will change to indicate a splitter bar.
- Press and hold down the left-hand mouse button to drag the splitter bar to the desired position.
Note: The window positions for dockable windows are not associated with the current design; they remain the same no matter which design you open. The window positions are also persistent across sessions. When you restart, the windows will be restored to their previous configuration.
Dockable Window Context Menus
Each dockable window has a context menu accessed with a right-hand mouse button which include options to Hide or to switch to any of the three visible modes. As well as these standard items the context menus may include options specific to that particular type of window.
Selecting one of the other dockable windows from this context menu will add it as a tab to the existing dockable window.
Using Auto-Hide Windows

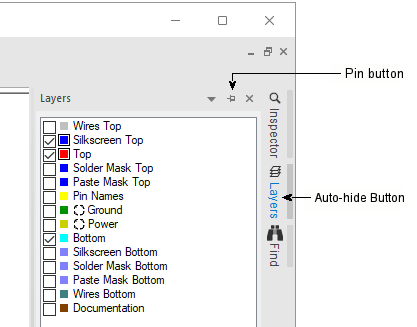
When a window is docked, a pin button is visible in its title bar. Clicking this pin button will make the window an auto-hide window, sliding it out of view and placing an auto-hide button to represent it in the adjacent border. Moving the mouse over the auto-hide button will cause the window to slide back into view and becomes useable. When the mouse is moved away, the window will once again slide out of view.
It is possible to adjust the time allowed before an auto-hide window slides out of view from the Options tab on the Customise dialog.
To hide an auto-hide window completely. Click on the close button X in its title bar when it is visible.
Clicking an pin button of the auto-hide window when it slides into view will turn it back into a normal docked window and its auto-hide button will disappear.
Clicking on the Auto-Hide button rather than just moving the mouse over it will cause the slide out pane to remain until the mouse is clicked elsewhere in the application window rather than sliding away once the mouse pointer is moved outside of it.
Using Tabbed Windows
A tabbed window contains multiple dockable windows and may be manipulated like any other dockable window in that it may be resized, docked, floated or auto-hidden. Additional dockable windows may be dragged into the tabbed window and existing tabs may be dragged out to become individual windows once again.
Tabs may be re-ordered simply by dragging into the desired order.