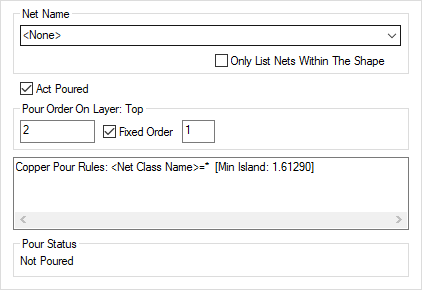
This dialog is displayed when the Properties option is chosen with a Template shape selected.
It shows and allows you to modify properties for the selected Template shape.
Shortcuts
Default Keys: I or Alt+Enter
Default Menu: Edit
Command: Properties
Locating this option
Available from: Edit menu > Properties option
Available from: Context menu > Properties option
Available from: Shortcut key > I
Using Templates
Templates are used to define the outline of a Copper Pour Area or the boundary of a Split Power Plane. Use Insert Template to see how to add a template.
Use Copper Pour to create the poured copper inside the template.
Using the Template Properties Dialog

Net Name
Use the Net Name drop down list to specify the name of the net that you want to associate with the template. When the template is poured, items on this net will have ‘spokes’ of copper joining them to the poured copper.
If you have selected a Net Name, the Spacing and Thermal Pad Rules are determined by the Rules associated with that Net Name or Net Class. Facets of the poured copper are also controlled using the Copper Pour rules dialog. Different Thermal Rules can be defined and applied for different applications within the design. For example, if you have a high power sub net which requires thicker spokes and greater isolation. A combination of Thermal rules and Spacing Rules can be applied to give you different desired effects. All rules for the Template can be viewed in the rules summary pane.
It is possible to match alternative rules for this specific template by adding matching attributes
on to the template itself. For example, you could create an attribute called SpecialRules,
add this attribute to the template and create a Thermal Rule which matched SpecialRules.
These alternative rules are applied instead of whatever rules would have matched the Net, but for
this template only. In particular, you can add a
You can choose to Only List Nets Within The Shape (Meaning nets with an electrical item contained or crossing the Template shape). This will aid Net selection when choosing a Net Name for the Template.
Act Poured
Act Poured, when checked, causes the template to behave as though it were a copper area for connection and Optimise purposes. That is, the template can have connections going to it. This means that you get a more realistic connection pattern, without having to pour the template. Pouring templates is often best left until near the end of the design process. Once the template is poured, it can no longer have connections, any connections are transferred to the poured copper. You can make this the default setting for new templates.
Pour Order On Layer: XXX shows the position in the order that this template will be poured in, when pouring all templates. (Obviously, this order makes no difference if you pour them all individually). The order is within the templates on the same layer, as there is no interference between templates on different layers.
You can make a template have a Fixed Order, and specify the position within all the fixed order templates on that layer. By default, templates are poured from smallest to largest by area (excluding cutouts); if there are templates with fixed order, these are poured in that fixed order, regardless of area. Use Ordered Template Pour to interactively view and define the order. Note: Templates on Split Power Planes define the splits, they do not have an order and are not poured.
Rules Used Summary
There is a summary of the Copper Pour and Thermal Rules that will apply to the selected template. These are determined by any attributes on the template, as well as the net the template is on.
Pour Status
The Pour Status entry will show you whether the selected template currently has copper Poured or Not Poured into it.
Final Check
Make sure the copper is poured before producing your final plots.
Related Topics
Insert Template | Copper Pour | Options - Interaction | Ordered Template Pour | Technology - Spacing Rules | Technology - Copper Pour Rules | Technology - Thermal Rules | Split Power Planes