Use this option to add a serpentine section of track to selected segments. Serpentines are used to increase the length of a track, this is required when signal timing is an issue. A serpentine route consists of a winding path of track within the routing.
You can also apply serpentine routing to a Differential Pair by selecting either of the paired tracks, this will serpentine one side of the pair (depending on which side the cursor is on). This will lengthen one side relative to the other. You can also serpentine the pair together (by unchecking the Serpentine Single Differential Pair Track on the context menu). This will lengthen the overall pair, without significantly changing their lengths relative to each other.
Serpentines are stored as special track sections with all of the parameters used to generate them, so it is possible to re-edit them later. Deleting a serpentine track section is easy, just select it and press Delete.
Note: Interactive options do not apply to serpentine sections added to the design prior to Version 9.0. These should be replaced to use full functionality of serpentine including the associated DRC checks.
Shortcuts
Default Keys: None
Default Menu: Context menu
Command: Add Dynamic Serpentine
Default Keys: None
Default Menu: Context menu
Command: Serpentine Selected Segments
Default Keys: None
Default Menu: Context menu
Command: Remove Serpentine Routing
Default Keys: None
Default Menu: Context menu
Command: Remove Serpentine Controls
Default Keys: None
Default Menu: Context menu
Command: Reduce Serpentine Routing
Locating this option
Available from: For a selected Track or Track Segment > Context menu > Serpentine option
Serpentine Routing Parameters
Normally you will define Serpentine Rules in the Technology dialog. The matching rule will provide the correct parameters for the selected segments. You can choose to change these parameters whilst adding the serpentine. If you change the parameters locally, then the serpentined section has lost it’s connection to the technology rule. This is significant if you use the Design Rule Check to ensure all serpentine sections are up to date relative to the technology, as sections with rules which have been edited away from the technology will not be checked. The Serpentine Properties will indicate if they are using a technology rule.
Adding Serpentine Routing Dynamically
Enter the Serpentine Mode and select a track segment. You can then drag along the segment and the loops are added provided they comply with all the parameters. You can also drag around corners.
If you have Online DRC on, the loops will obey the design spacing rules.
Obey length rules will continue to add loops until the length target is satisfied. You can use the Track Length Limits to give you a dynamic visual indication of the track length, and any rules that apply.
Whilst dragging, you will be able to see the defining box which shows the limits of the serpentine.
The context menu gives you some options:
Serpentine Both Sides
With this option selected, the perpendicular loops are centred across the original line of the track. With this option off, the loops are to one side of the original line, the side determined by which side the cursor is on.
The picture below illustrates the Serpentine routing biased both sides of the track centre line.

The picture below illustrates the Serpentine routing biased to one side of the track centre line (with the Serpentine Both Side option unchecked).

Increase/Decrease Gap (Separation)
These commands will change the separation by one tenth of the track width. Changing the separation will move the parameters away from the technology rule (see Serpentine Parameters).
Editing a Serpentine Route
You can interactively re-edit a serpentined route by selecting and then dragging the defining box in the appropriate direction. So you can stretch the serpentine at either end, or stretch it outward (i.e. increase the amplitude), or drag the whole section along the track by selecting in the centre. All existing rules and parameters will be applied.
Adding Serpentine Routing as a Batch Operation
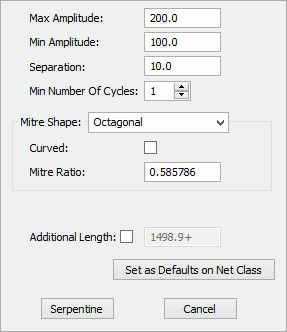
Select the segments which should be converted to Serpentine and use the Serpentine Selected Segments command, which should be available on the context menu.
The parameters dialog will appear, you can change the parameters as described above. The serpentine section will be added according to the rules.
Adding Additional Length to Serpentine Routing
You can explicitly define the maximum Additional Length this serpentine section should add. If you are obeying length rules, then this Additional Length will default to the maximum allowed. Increasing the Additional Length beyond this figure will still not cause the resulting track length to break the rules.
Remove Serpentine Routing
This function will remove the entire run of serpentined track, returning it to a straight line section. This can also be done by simply selecting the serpentined section and pressing Delete.
The Remove Serpentine Routing function will also work on serpentine looking track even if it is not a serpentined section of track created using the serpentine tool.
Remove Serpentine Controls
This function will remove the controls on a serpentine track, changing it to a normal track. The track can then be edited in the usual way. Once you have removed the controls, it cannot be converted back to a controlled serpentine. Reduce and Remove Serpentine Routing commands may still work, as the software recognises serpentine looking track.
Reduce Serpentine Routing
Use the Reduce Serpentine Routing function to remove a single loop from the serpentined track at the end closest to the selected point.
This function will also work on serpentine looking track even if it is not a serpentined section of track created using the serpentine tool.
Adding Serpentines to Differential Paired Tracks
Differential Pairs can have Serpentine routing applied to them. This can be for one (Single) track of the Diff Pair to provide Skew to the track, or to Both tracks of the Diff Pair to provide extra length to the overall Diff Pair routing, perhaps to match another pair or pairs of Diff Pairs.
With the (Add) Dynamic Serpentine mode selected (from the right mouse menu for a selected Diff Pair), right clicking immediately will allow you to select the Serpentine Single Diff Pair Track mode or to deselect it. For a single or both tracks, you can also optionally select the Serpentine Both Sides mode depending on what your requirement is.
The Serpentine Both Sides mode allows the serpentine to be biased equally around the centre line of the track or if deselected, will bias the tracks to one side of the track.
The menu below is shown for Both tracks of the Diff Pair being routed equal distance around their centre line (Serpentine Both Sides enabled):
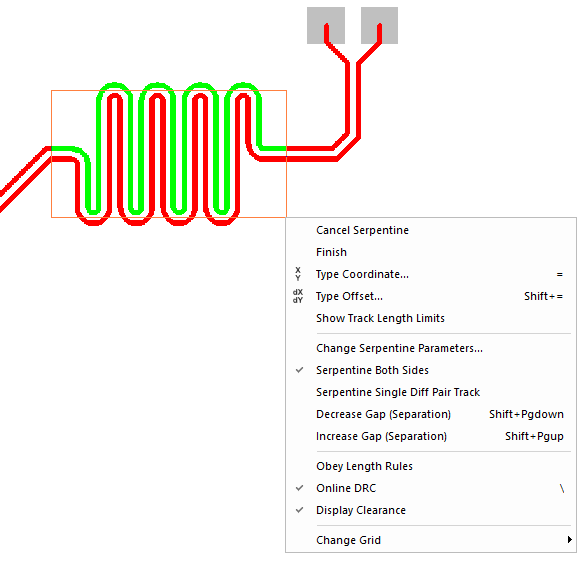
The menu below is shown for both Tracks of the Diff Pair routing to a Top bias and engaged by moving the mouse above the pair centre line:
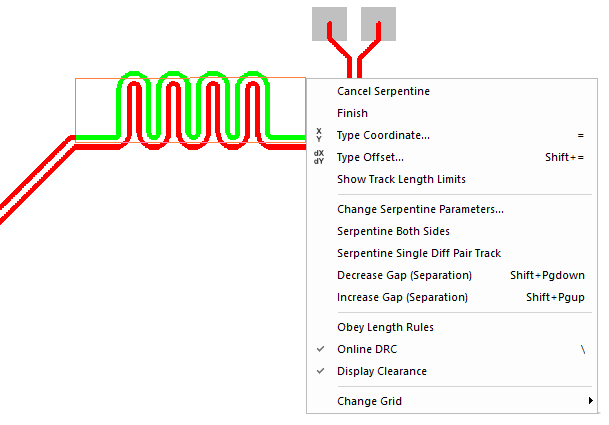
The menu below is shown for both Tracks of the Diff Pair routing to a Bottom bias and engaged by moving the mouse below the pair centre line:
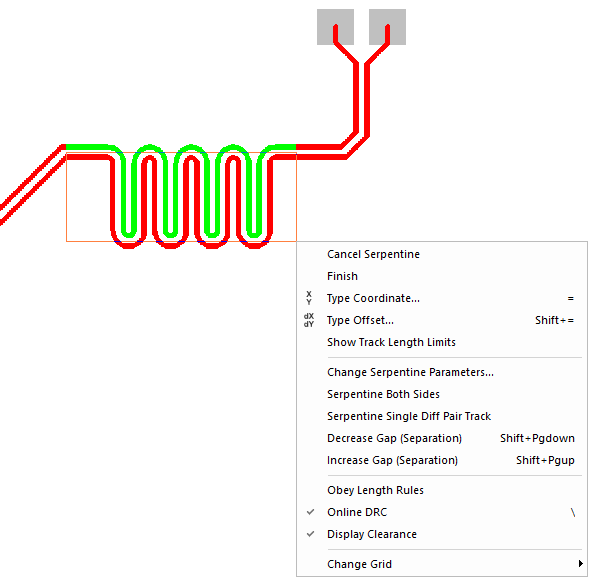
The menu below is shown for Single (Serpentine Both Sides switched off) Diff Pair track routing being routed equal distance around the centre line. This forces the non-serpentine track of the pair to be extended downwards to enable serpentine routing to take place:
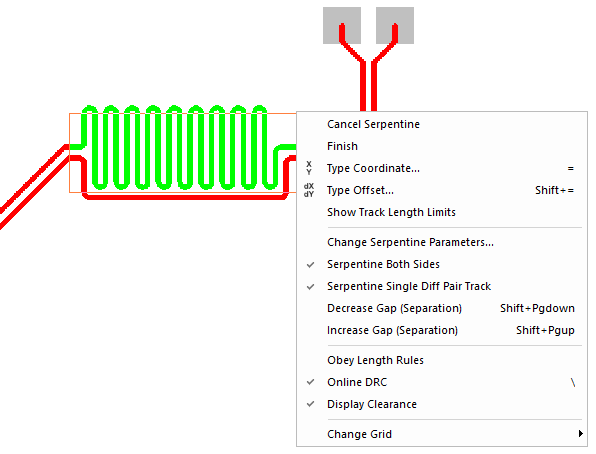
The menu below is shown for Single (Serpentine Both Sides switched off) Diff Pair track routing being routed with the bias above the centre line. This means the non-serpentine track of the pair remains unchanged:
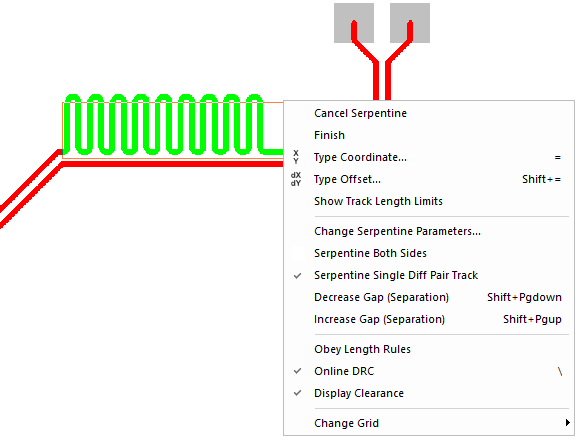
The menu below is shown for Single (Serpentine Both Sides switched off) Diff Pair track routing being routed with the bias below the centre line. This forces the non-serpentine track of the pair to be extended downwards to enable serpentine routing to take place:
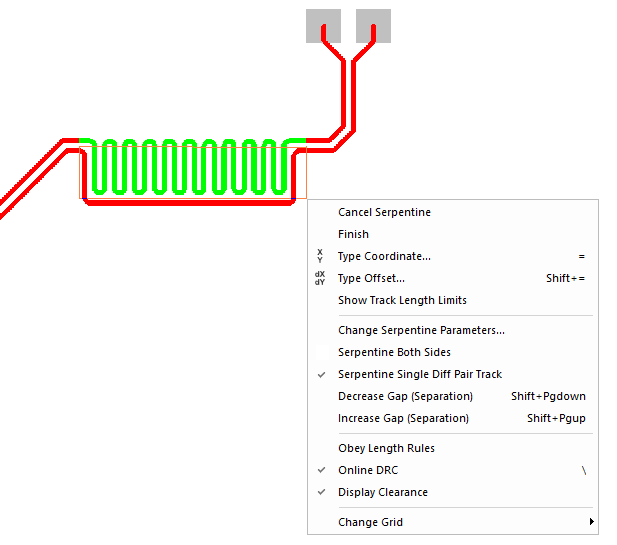
Related Topics
Technology - Serpentine Rules | Technology - Spacing Rules | Track Length Limits | Properties - Serpentine | Design Rule Check