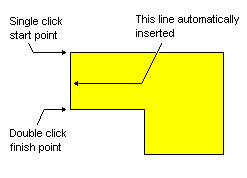
Use the Insert Polygon Shape option when creating non-rectangular shapes. These shapes can be Open or Closed depending on the type of item you are adding.

For faster shape creation you can also insert a rectangle and insert a circle.
Once you have started adding the shape, see the Edit Shape help page for a more detailed description of how to insert polygon segments.
Shortcuts
All shape types have their own Insert Polygon commands.
Default Keys: None
Default Menu: Insert
Command: Insert Copper Polygon
Locating this option
Available from: Insert menu > Copper Polygon option
How To Insert A Polygon
-
From the Insert menu, select Board or Copper, etc., then select Polygon from the sub-menu. Or, use one of the shortcuts mentioned above.
-
A modal cursor will appear showing a small shape, and you will be prompted on the status bar to select the start position for the polygon. Before you start the polygon, there are a few commands on the shortcut menu for setting up the shape parameters. For example, the correct layer, style, filled state, etc.
-
If you have added construction lines to your design to define the shape to be added, you will find on the shortcut menu two commands for using these lines to create the shape.
-
Use Construction Regions
This will put you into a special mode (with its own modal cursor) where you pick in the middle of regions that are completely surrounded by construction lines to add, or remove, the shape defined by those construction lines to, or from, the polygon being added. This way you build up the required polygon by adding or subtracting shapes formed by the use of intersecting construction lines.
-
Follow Construction Lines
This will put you into a special mode that automatically snaps to, and then follows the path of the closest construction line.
Left click to start the polygon and the shape will start from the closest point on the nearest construction line.
Move the cursor, and the polygon will automatically slide along the construction line. When it reaches an intersection between two construction lines, it will follow the line exiting the intersection that is closest to the moving cursor. This way you can use the construction lines to fully or partially define the shape to be added by tracing around the available construction lines with the mouse.
Use single left click to stop following construction lines and allow you to move away and add corners individually to complete the shape, or use double click to finish the shape on the construction line currently being followed.
-
-
If you are not using construction lines directly, you will use the basic method of adding a polygon by defining individual corners in turn as follows.
If you want to start the shape on a point on an existing item in the design use the Snap To Item option. Before defining the start point, check the Snap To Item option from the shortcut menu. When the start point is picked it will snap to the nearest point on the item underneath the cursor.
After enabling Snap To Item a further option is available on the shortcut menu called Snap To Arc Centre. Check this if, when picking near an arc or circle, you want the pick point to snap to its centre.
-
Left click the mouse to define the point you wish to start the Polygon from.
Alternatively if you want to type the coordinates of the start position you can right click and from the context menu select the Type Coordinate option or the Type Offset option. Both options will ask you to enter the coordinates of the start point, but the Type Offset option allows you to enter offsets rather than coordinates for the next corners. Follow the links to see more information about typing positions for shape corners.
An origin marker will be drawn to show where the shape is starting from. Dynamic segment(s) will appear from this point.

-
Left click the mouse to add each corner of the Polygon. If the Snap To Item option is on, each corner will snap to the nearest point on the item underneath the cursor.
Again, you can type the corner positions using the Type Coordinate or Type Offset options from the shortcut menu. Press the Apply button or use the < Space > key between the coordinates or offsets to keep typing corner positions.
-
Double click the left mouse button to finish the shape. If a closed shape is being inserted, the system automatically completes the shape for you back to the start point.
If typing the corner positions, finish the shape by pressing the Finish button or typing the ”=” key after entering the coordinates or offsets for the last corner.
-
The commands available to you whilst inserting a polygon are found on the right hand mouse activated shortcut menu. See the Edit Shape help page for more details.
The shape you create can be modified by selecting Select Mode from the toolbar, selecting the segment to be modified and dragging the segment to the new position or using Double Click to edit the segment to insert more corners.
Related Topics
Construction Lines | Edit Shape | Shape Defaults | Options - Interaction