Use this to set up preferences that affect how breakouts behave when being added or edited in a Footprint design. Note: Breakout editing is only available in the Footprint Editor.
Shortcuts
Default Keys: O
Default Menu: Tools
Command: Options
Locating this option
Available from: Tools menu > Options > Edit Breakout page
Using the Edit Breakout Tab
All of these options are saved to the registry, so they apply to all the designs you load into the application. Most of these switches can also be changed using the shortcut menu whilst using Edit Breakout.
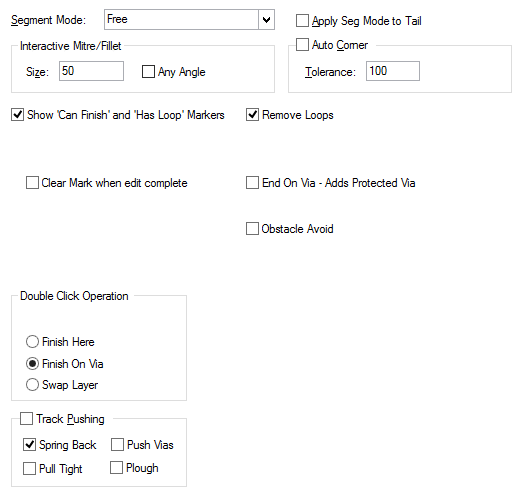
Breakout Segment Editing
Segment Mode
This defines the default restrictions on the orientation of segments when creating or editing a breakout. You can change the Segment Mode at any time whilst creating or editing a shape by using the Change Segments option on the Edit Breakout shortcut menu.
There are 4 options:
Orthogonal  | Angled (45)  | Curved (90)  | Free  |
| Alternate shape segments are vertical and horizontal lines. | Alternate shape segments are orthogonal and 45 degree lines. | Alternate shape segments orthogonal line and 90 degree curve. | There is no restriction on the segment orientation, so free line. |
Interactive Mitre/Fillet
Defines the size of mitres and fillets which are added interactively to round off sharp corners between two straight breakout segments. They are added when using Edit Mitre or the Segment Modes Orthogonal (Mitre), Orthogonal (Fillet) and 45 Angled (Fillet).
A mitre is a straight line across the corner, and a fillet is a curve to produce rounded corners. On a 90 degree corner between two orthogonal lines they will look like:
Mitre  | Fillet  |
| Mitre gives fixed size 45 degree angled segments. | Fillet gives fixed size 90 degree curved segments. |
Mitres and Fillets are a fixed size, which is specified in the Size edit box. The Size is the radius of a circle that is a tangent to the lines that meet at the corner. A Fillet will be the part of the circle between the two lines, and a Mitre will be a straight line between the same two points. For 90 degree corners between orthogonal lines, the size will be the orthogonal width and height of the mitre.
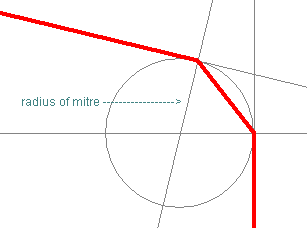
Check the Any Angle box to allow Edit Mitre to mitre or fillet between straight lines with any angle between them. Leave unchecked to only allow mitres or fillets between lines orthogonal and perpendicular to each other.
Mitre  | Fillet  |
| Mitre gives fixed size 45 degree angled segments. | Fillet gives fixed size 90 degree curved segments. |
Auto Corner
This is an advanced editing feature which allows breakouts to be drawn without having to click the mouse at each corner. (Note, this feature does not operate in Free segment mode). You must define a tolerance, which is the distance the cursor must move away in a perpendicular direction from the first segment you are adding before a corner is added. You can still click at any time to add a corner. It is recommended that the Tolerance is larger than any grid and mitre size you are using.

In the example the cursor is at the bottom of the second selected (white) segment. As you move right the first selected segment gets longer. When you move down so that the second selected segment is longer than the auto corner tolerance, a corner is added and the first selected segment is complete.
Apply Seg Mode To Tail
When checked, applies the same segment mode to the lead and trailing segments when editing an existing breakout segment.
No Seg Mode To Tail  | Apply Seg Mode To Tail  |
| Trailing segment is at a free angle. | Segment mode is applied to the trailing segment. |
Other Edit Breakout Switches
Show ‘Can Finish’ and ‘Has Loop’ Markers
These take the form of Modal Cursors or, if Modal Cursors not enabled (see General Options), then dynamic markers are drawn in the highlight colour. They appear at the cursor position to indicate that clicking would do something different from just the normal add corner. The following 3 Markers exist:
Can Finish Here  | Can Finish On Via  | Loop To Remove  |
| Left click whilst this marker is shown will result in the track being finished and attached to the item underneath the cursor. | Control Click whilst this marker is shown will result in the track being finished on a via through to the item underneath the cursor. | Left click whilst this marker is shown will result in a loop in the track being removed from the track. |
Remove Loops
Use this to allow loop removal when breakouts are finished. This is the normal mode, but occasionally you may want to create loops in breakouts. If this mode is not checked, the loop removal marker is not used. Loops will only be removed within the breakout path, not anywhere on the net.
End On Via - Adds Protected Via
Use this when adding breakouts to protect vias added using the ‘End On Via’ option against automatic deletion and layer span changes.
Double Click Operation
Finish Here to let Double Click simply finish the breakout in space.
Finish On Via to let Double Click finish the breakout and add a via at the end of the breakout.
Swap Layer to let Double Click insert a via and continue the breakout on the opposite layer.
Track Pushing
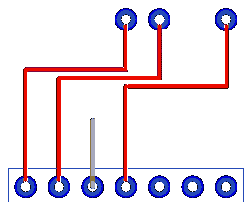 | 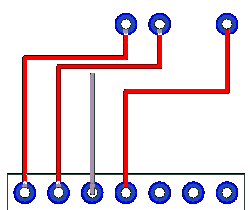 | 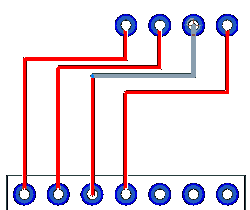 |
When adding, editing or moving a breakout segment, existing breakouts may get in the way. With Track Pushing enabled, nearby existing breakouts are Pushed away from the one being edited, making design rework much easier. The pushed breakouts are frozen at their current location when a corner is added and the pushing begins again. Only a limited amount of effort is applied to the pushing, as it is not desirable for a small breakout modification to push breakouts across a large area of the design. With Online DRC enabled, the pushing will not introduce design rule errors, otherwise breakouts may be pushed over other items, causing errors.
When Spring Back is enabled, pushed breakouts will move back to their original position as the edited breakout is moved away. Spring Back is recommended. It is also possible to push vias using the Push Vias option. This option will allow vias to be moved, you should be aware that moving a via may make it necessary to rework breakouts on other layers.
Other Options Tabs
| General Options: | Design Backups | Display | Edit Shape | File Extensions | Find | Folders | General | In-Place Names | Macros | Move | Multi-Screen | Pan & Zoom | Resolve Net Names | Select | Synchronisation | Tooltips | Warnings |
| PCB Options: | Edit Track | Interaction | Online DRC | Track Length Limits |
| Schematics Options: | Edit Connection | Interaction | Online ERC |