Use this to add a Part to a Schematic Design, by selecting its SPICE model.
Shortcuts
Default Keys: None
Default Menu: Simulation
Command: Insert Part Using Model
How To Insert A Part Using The Model Name
Click on the Insert Part Using Model option from the Simulation menu, or click on the icon (shown above) on the Simulation toolbar.
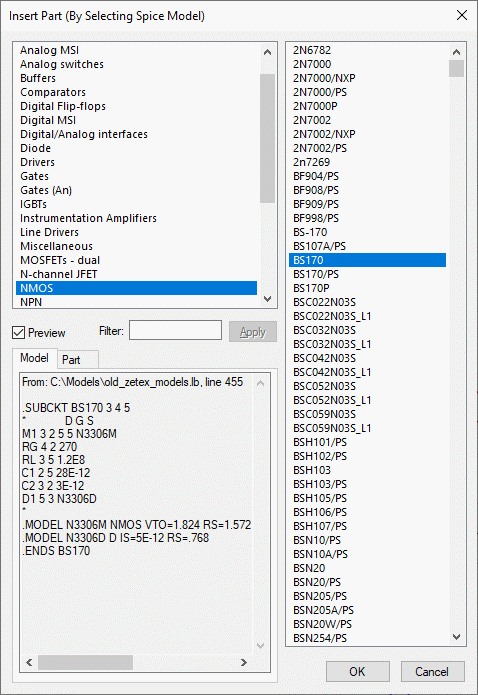
The following dialog will be displayed:

The lists contain all models from the Pulsonix-Spice Simulator model libraries that have been associated with a Pulsonix Part. This association is done within the Simulator using the Assoc Models and Parts dialog accessed from the Model Library sub-menu on the File menu.
Model Category
Click on a model category on the left side of the dialog to display a list of model names associated with that category. If you do not know what category the model is in, you can use *All Models*, found at the top of the category list.
Model List
Select the required model name and press the OK button, or just double click on the model name, to interactively place the associated part in your circuit. Once placed, another component will be offered to place. Press Escape to return to the Insert Part Using Model dialog.
If a specific part in the library is found with its
Filter
Use the filter to restrict the list to only model names of interest to you. If you change the filter, it will only be applied when the Apply button is pressed. A greyed out Apply button means the filter shown is being used. Standard wildcard characters ”*” and ”?” can be used, see Using Filters for more details.
Preview
Checking this box will extend the dialog to include a preview section containing a tabbed control. Choose Model to view the model text from the selected model library file, or choose Part to view the part that will be added to the design.
Note that the simulator must be running in order for the view model feature to work. If the simulator is not running it will be started when required to get model information.
Duplicate Models
Some models have duplicate names, but are in library files with different extensions. In this case the duplicates will be shown, but with the model library file extension appended in square brackets.
For example, TLC2252 in file TLC2252.ver1 and TLC2252 in file TLC2252.ver2.
These would be represented in the list by TLC2252[.ver1] and TLC2252[.ver2].
The correct model will be used in the netlist.
Finding Your Model
If your model name is not in the list then first use the Simulator’s Assoc Models and Parts option to assign your model to a Pulsonix Part, and then use the Simulator’s Re-build Catalog option to re-create the “out.cat” file that Pulsonix uses to get the models listed in this dialog.
If, when using Assoc Models and Parts your required Part name is not available, then one of two things could be wrong.
-
Your Pulsonix part’s symbol might not have the same number of pins as the model.
-
Secondly, you may not have informed the Simulator about any new parts recently added to the Pulsonix libraries.
Do this by using the Simulator Setup option from the Simulator sub-menu on the Pulsonix Simulation menu.