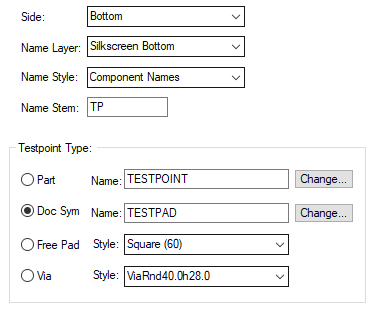
This tab allows you to set the default properties used when using the Insert Testpoint option.
Shortcuts
Default Keys: Shift+D
Default Menu: Setup
Command: Design Settings
Locating this option
Available from:
Setup menu > Design Settings option > Defaults > Testpoint page
Setup menu > Technology option > Design Settings > Defaults > Testpoint page
Using the Testpoint Defaults Tab

Side
Choose a Side from the drop down list. This will be the side that the testpoint will live on. The list will be populated with probe sides based on the rules defined in your Technology TestPoint Rules dialog.
Name Layer
This is the Layer that the Testpoint Name is added to and is selected from a drop down list defined in the Layers dialog, this can be any layer in your design.
Name Stem
The Name Stem is the default name that the Testpoint Name will take when adding a new Testpoint to your design. Each Testpoint will have a unique Name, TP1, TP2 etc.
Testpoint Type
Choose the type of testpoint that you will add by default to the design. During Insert Testpoint, you can change the type by selecting another type from the context menu.
Part - choose a Part using the Change Part dialog.
Doc Sym - choose a Doc Symbol using the Change Doc Symbol dialog.
Free Pad - choose a Free Pad from the list of Pad Styles defined in your Technology dialog.
Via - choose a Via from the list of Pad Styles defined in your Technology dialog.
Related Topics
Insert Testpoint | Technology Overview | Technology - TestPoint Rules | Technology - Layers | Technology - Pad Styles | Properties | Change Part | Change Doc Symbol