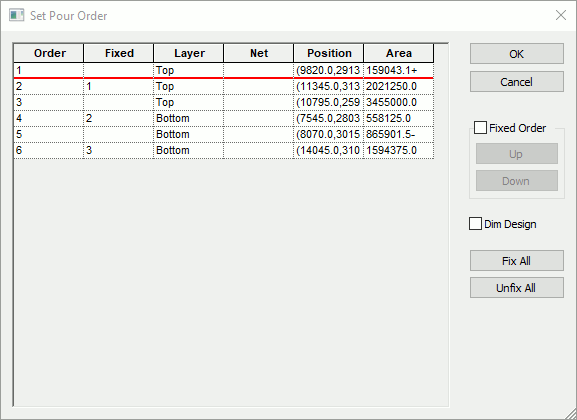
This dialog allows you to see all the templates in your design and set the into the order in which they should be poured.
Shortcuts
Default Keys: None
Default Menu: Utilities
Command: Set Pour Order
Locating this option
Available from: Utilities > Set Pour Order option
How to set the Pour Order
The Set Pour Order dialog is used to determine the order in which templates are poured when you use Pour copper - Apply To All. Using the dialog is an alternative to the Ordered Template Pour interactive method or the setting of pour order for individual Templates using Properties.
Why is Pour Order necessary?
In many cases, the order in which templates are poured is not an issue. If you simply have a number of templates arranged well away from each other on the same layer, or perhaps only one template per layer on a few layers of your design, then the order in which they are poured is not important.
However, consider the case where you have one template ‘nested’ inside another, as shown in the example below. Here you can see that it is important to pour the ‘inner’ green template first, otherwise pouring the ‘outer’ blue template will pour across where the inner one wants to go.

How Pour Order is determined
By default, templates are ordered by area (the area of the outline shape - without subtracting cutouts). This order is determined dynamically at the time of use. Changing the area of a template, or adding a new template may change the order. In many cases this is sufficient. However, you may wish to resolve certain conflicts and this is done by setting a Fixed order on some templates. This fixed order determines the order amongst the fixed order templates on a given layer, those without fixed order will slot in to the order according to area. You therefore need at least two fixed order templates on a layer before this has any effect on the order.
Using the dialog
The dialog shows the templates in your design (excluding templates on power plane layers which define a split plane and should not be poured). The currently selected template is highlighted in the design.
When the  cursor is displayed, each template listed in
the dialog can be selected in the design using the left mouse button, highlighting it in the list.
This is a more interactive method of selecting templates.
Whilst the dialog is open, viewing tools such as Pan and Zoom can be used in the design, making it easier to find templates.

The list is ordered firstly by layer, then by the actual order the template will be poured in.
Each entry in the list shows the layer on which the template appears, and the net (if any) to which it is assigned. Also the position of the top left corner of the template bounds, and the area of the outline (without subtracting cutouts - this is the area used to determine the default order).
Use the Fixed Order check box on the dialog to fix or unfix the currently selected template.
The design can be dimmed and undimmed using the Dim Design checkbox.
You can use the Up and Down buttons to move the currently selected Fixed template through the Fixed order. You will notice that the template will move to it’s new position in the pour order.
Use Fix All to make all the templates Fixed in the current order, and Unfix All to reset to the default order by size.
Related Topics
Insert Template | Pour Copper | Clear Template | Ordered Template Pour | Template Properties