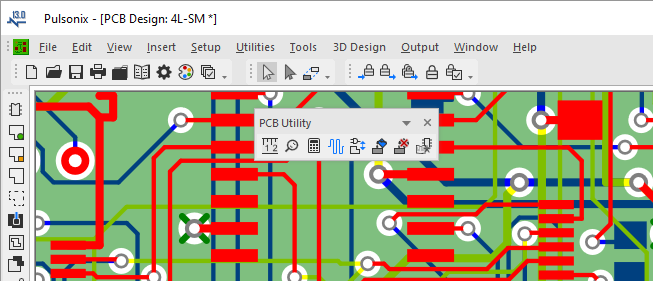
Toolbars are provided as part of the Pulsonix user interface to give quick and easy access to the most commonly used tasks. They are presented on screen as rectangular bars containing small images called icons, each of which represents a clickable button or command.
When you first start Pulsonix in its default configuration, the Standard toolbar appears docked just below the Menu Bar. As you create the various types of designs, other toolbars appear automatically.

Depending on your workspace preferences, and the size of your screen, you can display as many toolbars as you want, or none at all. You can resize a toolbar, and move the toolbars to different locations to suit your needs. You can also add a button to a toolbar or even create your own toolbar by using the Customise Toolbars Dialog .
You can make any toolbar be docked or floating.
In docked mode, a toolbar is fixed along any of the four borders of the main window and will have a Gripper bar across the top or down the left. You cannot modify the size of a toolbar when it is docked.
In floating mode, a toolbar has a title bar and can appear anywhere on your screen. A floating toolbar is always on top of all other windows. You can modify the size or position of a toolbar when it is floating.
You can display quick information about each toolbar icon by placing the mouse pointer over it. (You do not click or press a mouse button.) A tooltip displays the name of the toolbar command, and a brief description appears in the status bar in the lower left corner of the application.
A toolbar has a Page button that provides access to hidden buttons when the full extent of toolbar is not visible in docked mode and appears at the right or bottom of the tool bar. It also allows toolbar buttons to be hidden/shown via the ‘Quick Customisation’ menu. In a floating toolbar, it is located next to the hide button in the title bar.
Toolbar Appearance
The appearance of a toolbar can vary depending on the Application Look being used. Above, toolbars are shown using the Standard look.
At the left hand end of the Standard toolbar, docked below the Menubar, is the Gripper bar and at the right hand end is the Page button.
To show or hide a Toolbar
- In the Customise Toolbars Dialog click the appropriate checkbox in the list of toolbars, or
- Right click on the Menu bar, Status bar or any Toolbar then click the name of the toolbar on the shortcut menu to toggle its visibility.
- To hide a floating toolbar, click the Hide button in the upper-right corner of its window.
Note: By default toolbar display is context-sensitive. When you begin editing or start a new design, the toolbars that are appropriate for the type of design you are using will automatically appear. Optionally, any other available toolbar may also be displayed using one of the methods described above. Once displayed a toolbar will always be displayed for that type of design unless explicitly switched off.
To change a docked toolbar to a floating toolbar
- Press and hold the left mouse button over the toolbar Gripper bar then drag the toolbar away from its docked position, or
- Double-click on the toolbar Gripper bar or in the toolbar border to move it to its previous floating position.
To dock a floating toolbar
- Point to the title bar and press and hold down the left-hand mouse button. A rectangular frame will appear. Drag the frame to the desired dock position. The rectangular frame will deform while dragging to reflect potential dock positions, or
- Double-click the toolbar title bar to return the toolbar to its previous docked location.
To reposition a docked toolbar
- Press and hold down the left-hand mouse button on the toolbar Gripper bar or in the toolbar border, a rectangular frame will appear, drag the frame to the desired docking position.
To position a floating toolbar without docking it
- Point to the title bar of the toolbar, then hold down the Ctrl key and press and hold down the left-hand mouse button to drag and position the toolbar over any dock area of the main window.
To resize a floating toolbar
- Point to any border or corner of the toolbar frame.
- Press and hold down the left-hand mouse button to drag the rectangular frame to the desired size.
Note: The toolbar positions are not associated with the current design; when visible a toolbar will remain in the same position regardless of the active design. The toolbar positions are also persistent across sessions. When you restart Pulsonix, its toolbars will be restored to how they were configured when it was last exited.