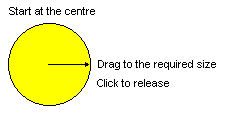
The Insert Circle uses the centre point of the circle as the reference. When starting the shape you are requested to start the circle where you expect the centre point to be. The shape is then dragged out the required size.
The radius is displayed on the status bar at the bottom of the main window. Shapes which require repositioning can be dragged into position following release. Likewise, the shape can be edited following release by selecting the shape and picking Edit Circle from the right hand mouse menu.
Shortcuts
Default Keys: None
Default Menu: Insert
Command: Insert option Circle
Example Shape:

Interacting with this option
Items which interact with this option on the context menu are:
Change Layer | Change Style | Closed Shape | Filled Shape | Online DRC | Display Clearances
Note: Online DRC and Display Clearances are only available when using the Insert Copper mode. Closed shape is always forced for the Insert Circle mode and is therefore not available for selection.
These items also affect the option and are found on the Options - Interaction dialog:
How To Use Insert Circle
-
From the Insert menu, select Board or Copper, Shape etc., then Circle.
-
Start the Circle by single clicking the mouse at the start point in the design, hold down and drag the cursor to the finish point of the Circle.

The drag can be in any direction and will create the circle. By default, it is created about its centre point. Use the Define From Centre command to toggle defining from the centre and defining about a diameter of the circle. When defining about the diameter, it is constrained to put the diameter at 45 degree stepped angles. Use the Free Movement command to allow the circle to be defined with the diameter at any angle.
The radius and angle are displayed in the Status Bar to show the circle’s size during the drag. Use the Enter Radius or Enter Diameter options from the context menu to set the circle to an exact known size.
Related Topics
Insert Polygon | Insert Rectangle | Insert Triangle | Properties - Shape Items