Use this interactive operation to spread out selected items in various ways to create space in the design. You can select the items to spread out before or after starting the function. The Spread Out option can be found on the Utilities menu.
There are four phases to the spreading operation:
- Select all the items, shapes or track segments you wish to spread out.
- Right click and choose one of the three methods of spreading that can be
used from the shortcut menu:
- Centre - Use this to centre the selection between two points or items.
- Equispace - Use this to equally spread the selected items between two points or items.
- Spread Out - Use this to proportionally spread the selected items away from an anchor point, radially or in a specified direction.
- Click to define an anchor point where you want to spread out from.
- Drag to spread out the items until they are in their required positions, or click to quickly define the second point to spread between.
Shortcuts
Default Keys: None
Default Menu: Utilities
Command: Spread Out
Locating this option
Available from: Utilities menu > Spread Out option
How To Use Spread Out
When the mode is entered, the current spreading method is displayed on the Status Bar. Use the following steps to spread some items:
-
Right click to change the spreading method from the shortcut menu. Choose from Centre, Equispace and Spread Out.
-
Select the items to be spread (if they have not already been pre-selected prior to entering the operation).
-
Left click to define the anchor point you want to spread from.
You can enable Snap To Item using the shortcut menu to force the anchor point to be on the picked item, otherwise it will be at the nearest point on the current grid to the picked position. If snapping to an item, you can choose to keep the Shift Key pressed down whilst picking it to use the origin of the whole item. You can also use Snap to Line Middle or End to force the anchor point to the nearest end or centre point of a picked line. The anchor point will be shown using a box containing a cross, drawn dynamically using the highlight colour.
If you want the anchor point at a different position, first remove it by pressing the Escape key.
-
Whichever method you are using, use the shortcut menu to choose to restrict the spread direction to a multiple of 90 or 45 degrees, or to use the less restrictive radial spreading. The chosen option will be displayed on the status bar.
-
If using the Centre or Equispace methods, you can now click the left mouse button to define the second point to be used to complete the centring or equal spacing operation.
The Snap To Item option will again be used here to pick an item to define the second point. See the description of each method below to see how the selected items will be repositioned between the two picked points.
-
If using the Spread Out method, or have chosen not to use a click to complete the operation, start dragging with the left mouse button to interactively perform the spreading out. If Snap To Item is enabled, and you are not using the Centre method, and a selected item is under the cursor, it will be dragged as you move the cursor.
A dynamic line (or circle if Spread Out and Radial Spreading is chosen) will be drawn in the highlight colour from the anchor point to the current cursor position. See the description of each method below to see how the selected items will be repositioned as you drag the cursor.
End the drag when you have spread the items to where you want them. The selected items will be repositioned and any tracks or connections attached to them will be altered in the same way as if you were simply moving them.
If you enable Online DRC from the shortcut menu, each selected item will be checked against all the surrounding items for any spacing violations or cross-overs. If errors are found, error markers are added to the design so you can see where the errors are, and a message box appears prompting you to choose whether to finish with errors or resume spreading (in which case the error markers are removed).
-
When spreading items, they will be placed in the optimum position as defined by the spread method, but you can force them to be snapped to the nearest grid point to that optimum position by enabling the Grid Items After Spreading option from the shortcut menu. The grid used will be determined by the interactive grid setting. You can use a shortcut key (default H) at any point to change the step size relative to the current working grid.
-
After completing the spreading the dynamic line (or circle) will be left on the screen to show where the spreading was performed. As soon as you click or drag again it will disappear.
-
If you decide that you have the wrong items or wrong anchor point, or the spreading is no longer required, press the Esc key to abort the spreading and go back to the selection and anchor point definition phase. Press Esc again to exit the whole operation.
The Spreading Methods
The spreading method and direction affect how the spreading is performed. Each method is described here.
Centre
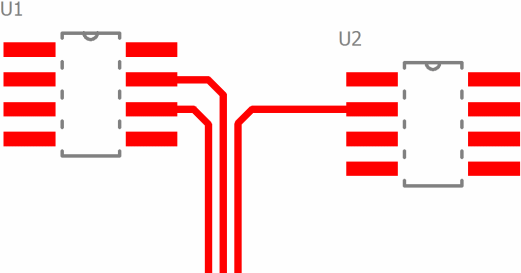
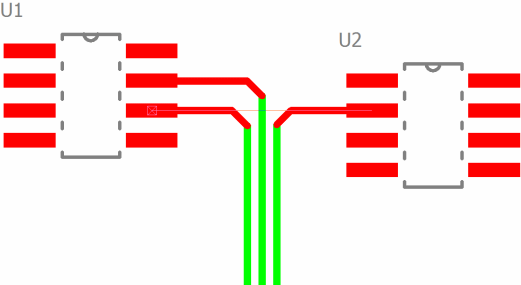
Use this to centre an item, or multiple items, between two points or picked items. For example to centre a selected track segment between two picked pads.
If the spread direction is restricted to Linear Spread (Angle 90) the line between the anchor point and end point will be snapped to the closest 90 degree angle and the centre of the selected items will be aligned with the centre of this line. If Linear Spread (Angle 45) is used the line will be snapped to the closest 45 degree angle, allowing centring in a 45 degree direction. Using Radial Spread will centre the selected items at the mid point between the anchor point and end point.
If Align is enabled from the shortcut menu, the centre of the selection will be moved onto the line between the two picked points. If left unchecked the selection centre point will maintain its original perpendicular distance from this line.
If you have picked items to centre between, and they are not part of the selection, enable the Between Item Edges option from the shortcut menu to centre the selection between the closest edges of the picked items, otherwise the origin of the picked items will be used. This option is useful when placing a track segment in the middle of the gap between a large and small pad.
Below is an example of the Centre function, here we have selected two pads and used the settings: Centre | Linear Spread (Angle 90) | Snap To Item | Between Item Edges
Before
After
Equispace
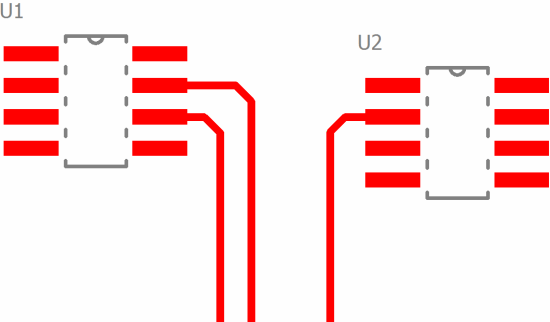
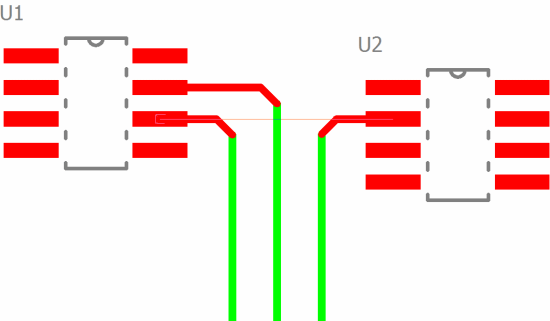
Use this to equally space multiple items between two points or two picked items. For example to equally space some parallel track segments between two picked pads.
If the spread direction is restricted to Linear Spread (Angle 90) the line between the anchor point and end point will be snapped to the closest 90 degree angle and the selected items will be spread equally in the direction of this line. If Linear Spread (Angle 45) is used the line will be snapped to the closest 45 degree angle, allowing spreading in a 45 degree direction. Using Radial Spread will first centre the selected items relative to their original positions at the mid point between the anchor point and end point, and then equally spread them out along that line.
If Align is enabled from the shortcut menu, each item will be moved onto the line between the two picked points. If left unchecked the items will maintain their original perpendicular distance from this line.
If you have picked items to equispace between, and they are not part of the selection, enable the Between Item Edges option from the shortcut menu to equally spread the selection between the closest edges of the picked items, otherwise the origin of the picked items will be used. This option is useful when equally spreading several track segments in the gap between a large and small pad.
Disable Equispace Outer Items on the shortcut menu to specify that the outermost selected items are to be placed at the limits of the line, and the rest of the selected items equispaced between them. For example, use this to frame select five parallel track segments and have the inner three equally spaced between the outer two. Enable Equispace Outer Items to include a space between the line ends and the outer selected items.
If Position Item Centres is checked the centre of each item will be used to position it. If left unchecked the origin of each of the selected items will be moved to the new equispaced position.
If Grid Items After Spreading is enabled, and the spread direction is a multiple of 90 or 45 degrees, an attempt will be made to keep the gaps equal by gridding them and moving the end items in a little so that the gaps are equal and all items are on grid.
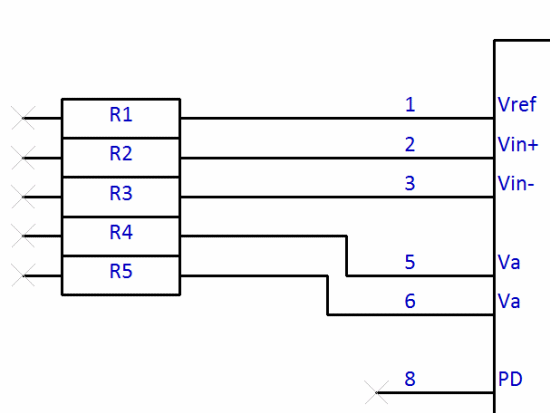
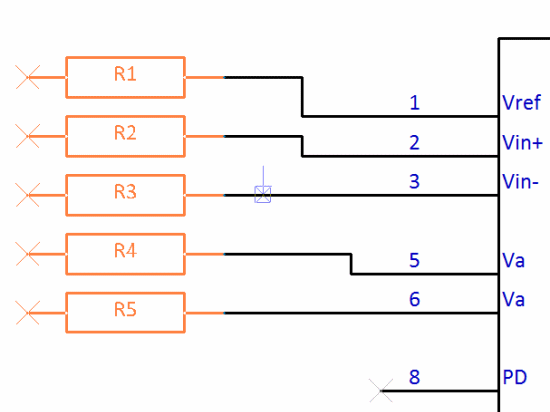
Below is an example of the Equispace function in action, here we have used the settings: Equispace | Linear Spread (Angle 90) | Snap To Item | Between Item Edges | Equispace Outer Items
Before
After
Spread Out
Use this to proportionally spread out the selected items away from an anchor point. For example to spread out some components to make space for tracks between them.
If the spread direction is restricted to Linear Spread (Angle 90) the line between the anchor point and end point will be snapped to the closest 90 degree angle and the selected items will be spread in parallel to that line. If Linear Spread (Angle 45) is used the line will be snapped to the closest 45 degree angle, allowing spreading in a 45 degree direction. Using Radial Spread will spread each selected item radially away from the anchor point.
Whilst dragging a selected item or point, it moves proportionally away from the anchor point in the spread direction. The status bar shows the scale representing this proportion. For example, if the scale is 2.0, all items have been moved twice their original distance from the anchor point.
If Position Item Centres is checked the centre of each item will be used to position it. If left unchecked the origin of each of the selected items will be moved to the new spread out position.
Below is an example of the spread function in action, here we have used the settings: Spread Out | Linear Spread (Angle 90)
Before
After
Spread Out Dialog
Additionally, a companion dialog can be accessed by choosing Spread Out Dialog… from the context menu. From here, a window will be displayed, documenting the origin point of the spread, and the radius or angle and distance of the spread, dependent on the spread method selected to be performed.
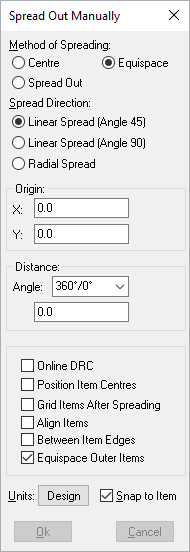
Below these fields, you can also toggle any of the additional options previously available from the context menu, as well as altering the unit of measurement used in the fields above.