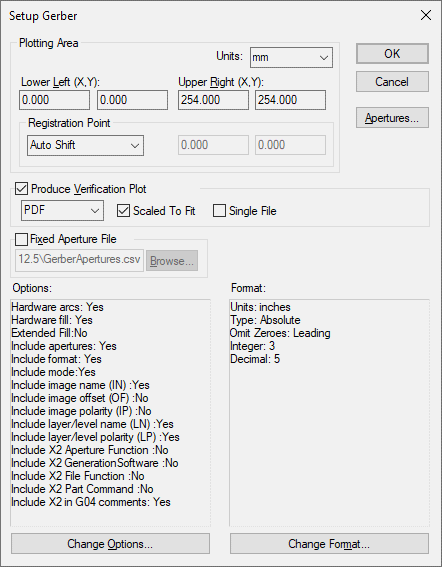
This dialog is used to set up the Gerber output parameters that do not generally change from design to design. The values set up here are maintained between program sessions so you should only need to set them up once, to correspond to the plotter you are going to use.
Locating this option
Available from: Output menu > CAM Plots > Plot Settings > Setup - Gerber button
Using the dialog
The Setup Gerber dialog is accessed from the Plot Settings page of the Output CAM dialog.

Plotting Area
These fields define the size of the plotting area or ‘plotter table’. This should be set up to reflect the size of the film for which you are going to generate your plots. The units in which these coordinates are displayed are shown by the button in the top right corner of this area of the dialog. Pressing this button will cycle through the available units, changing the values shown for the plotting area to match.
The Registration Point is used for alignment with the Design Position defined in the Plot Wizard for each plot.
Produce Verification Plot
Checking this option ensures that whenever a Gerber plot is generated, the program will read the Gerber file back in and produce a plot to either the default PDF output or the default Windows output. This plot thus provides a pictorial record of the actual Gerber file.
You can choose if the plot is Scaled To Fit the paper or plotted actual size (unchecked).
You can also choose to combine all verification plots into a single file using the Single File check box. If left unchecked, all plots produced will be individual files. This only applies to the Windows PDF output or PDF output.
Apertures
Press this button to display the current Gerber Aperture list in the Gerber Apertures dialog. This table lists all the apertures found during the production of previous Gerber files. This list is maintained between program sessions to ensure consistent aperture numbering.
Fixed Aperture File
Checking this option means that the Gerber output will only use the apertures defined in a CSV file that you supply. Any attempt to use apertures that are not defined by this file will cause an error to be reported during plotting.
The CSV file should contain aperture definitions in a particular format. The first line can show the field names for ease of reference when editing the CSV file. The fields required are shown in this example:
dcode,shape,width,length,cornerradius,rotation,hole,offsetx,offsety
72,round,0.6mm,0.6mm,0,0,0,0,0
73,round,1.4mm,1.4mm,0,0,0.9mm,0,0 10,square,60,60,0,0,32,0,0
The default units are thou/mils, but you can use mm by appending “mm” to each value as shown in the example.
Options
This box shows the current settings for the options which are available to control the content of the plot files.
Change Options
Press this button to access the Change Gerber Options dialog, which allows you to modify the settings shown in the “Options” box.
Format
This box shows the current settings for the options which are available to control the formatting of coordinates in plot files.
Change Format
Press this button to access the Change Format dialog, which allows you to modify the settings shown in the “Format” box.
Related Topics
Gerber Apertures | Change Format | Change Gerber Options | Output CAM | Plot Settings