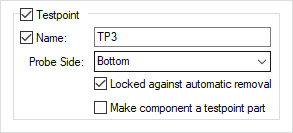
This dialog is displayed when the Properties option is chosen with a Pad or Via or Testpoint selected.
It either shows you the properties of a testpoint or gives you the ability to make a Pad or Via into a Testpoint.
Shortcuts
Default Keys: I or Alt+Enter
Default Menu: Edit
Command: Properties
Locating this option
Available from: Edit menu > Properties option
Available from: Context menu > Properties option
Available from: Shortcut key > I
Creating Testpoints
Testpoints can be created either from this dialog, or using Insert Testpoint, or using Change Testpoint
Using the Testpoint Properties Dialog

If the pad or via is not already a testpoint you can make it a testpoint by checking the Testpoint control. It will be given the next available testpoint name. If the pad is not on the testpoint grid.
If the pad or via is already a testpoint you can change make it no longer a testpoint by unchecking the Testpoint control.
The Name edit control can be used to give the testpoint a new unique name.
The Probe Side drop down list can be used which side the testpoint will be inserted. The values that will be allowed depend upon on the side of the original pad. If the pad is through hole then it can be probed in either Top , Bottom or Both sides. If it is a Top side pad then it can be probed from the top side. Similarly for Bottom side pads.
Locked against automatic removal, when checked, prevents the Automatic Testpoint Insertion tool from removing this testpoint.
The Make component a testpoint part checkbox is available when the selected components have a single pin, but were not added as testpoint parts. Check the box to make them testpoint components. A testpoint component, like those added through the Add Testpoint option, ensures the testpoint name and component name are kept the same.
Related Topics
Insert Testpoint | Change Testpoint | Auto Insert Testpoints