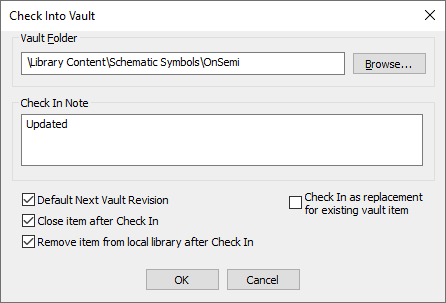
The Check Into Vault dialog for library items when you use the Check In button on the Library Manager dialog. Select one or more items from your library content, and click Check In.
The Check In button will be greyed out if you have selected items that are not from the Vault.
Using the dialog

Use the Browse button to choose a Vault folder in which the item is to be stored. Where possible this will default to the same folder as the one in which the current item in the Vault currently resides.
Enter a description in the Check In Note box, and check or uncheck the Close item after Check In check box depending on what you want to do with the library item after it has been checked in.
Revisions
The application will calculate the next revision (or the first one, for an item being checked in for the first time). If you wish to override this calculated revision, then uncheck the Default Next Vault Revision checkbox. On completing the rest of the dialog choices and clicking OK, an additional dialog will be displayed allowing you to choose a Revision Name.
Remove item from local library
To avoid confusion over which items are currently checked out to be edited, the normal behaviour is to delete each item from the local ‘checked out’ library file once they have been successfully checked back into the Vault.
Check In as replacement for existing vault item
Occasionally, the situation may arise where you have a replacement version of a library item that came from a source other than the vault. Checking this option allows such an item to be integrated into vault, superseding the previous version of the item. On completing the rest of the dialog choices and clicking OK, an additional dialog will be displayed allowing you to specify the vault item for which the check in item is a Replacement version.