Pulsonix has its own Autorouter and is based on a numerically stable mathematical topology. It is a gridless, 45 degree router which produces highly efficient routing patterns, minimising track length and via count, meaning it is capable of routing the finest pitched devices and highest routing density.
Shortcuts
Default Keys: None
Default Menu: Tools
Command: Auto Router
Browsed Nets
Default Keys: None
Default Menu: Tools
Command: Auto Router Browsed Nets
Route Selected Nets
Default Keys: None
Command: Auto Router Selected Nets
Locating these options
Available from: Tools menu > Auto Router > Auto Router
Available from: Tools menu > Auto Router > Browse Nets
Available from: Tools menu > Auto Router > Selected Nets
Using the Auto Router Option
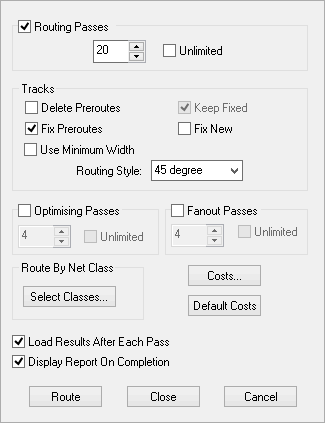
When installed, the Auto Router can be found on the Tools menu and when selected the following dialog is displayed.

This dialog provides you with different selections depending on which stage you are at with your routing. If, for example, you require all connections to be routed, then Routing Passes would be selected. Likewise, if you require an attempt on track length or via reduction, then you could just select the Optimisation Passes option.
Board Outlines
You should only have one board outline defined in your design. If you have nested boards (a board within a board), the inner most board is considered as a cutout of the outer board and will be avoided. If you have more than one, the autorouter will give you a warning message. If you wish to constrain the router, use Routing areas.
Routing Modes
- Routing Passes This invokes a number of routing passes which will route either all nets in the design or the specified nets, depending on which option started this dialog.
- Optimising Passes This includes re-routing passes which attempt to reduce the overall track length and via count once the Routing passes are complete.
- Fanout Passes This invokes a number of passes that route short escape tracks to vias from SMD pads. This is done before the Routing passes. Fanout passes are not necessary in order for the router to function, and is more useful as a initial phase before manual routing.
Routing Passes
Selecting the Routing Passes check box invokes the main autorouter. You can choose the number of routing passes that will used. Use will be either all nets in the design or the specified nets, depending on which option started this dialog. You can also select which Net Classes using the button on this dialog.
There is a trade off when choosing more routing passes to use as it will take more time to route. Having said that, if the design is larger or more complex, you may need more passes to get the autorouter to finish. If the autorouter routes to 100% before the number of specified passes as been used then no more passes will be attempted.
You can also use the Unlimited (passes) check box, in which case, the router will continue until the board is 100% complete, or until it is cancelled.
Tracks
Delete Preroutes When checked, existing routing is removed before attempting to autoroute the design. This works in conjunction with the Keep Fixed check box. Checking this option as well will enable preroutes to be unrouted unless fixed.
Fix Preroutes When checked, existing routing is protected against being ripped up by the autorouter. This would be routing that exists when entering the autorouter dialog.
Use Minimum Width If this is checked, if a net has a net class defined, the router will use the minimum track style (defined in the Net Classes dialog) as opposed to the nominal track style would normally be used.
Keep Fixed This will protect Tracks from being ripped up that are already fixed before they enter the autorouter.
Fix New Tracks added by the autorouter will be fixed when the autorouter has completed, They will be unaffected by the autorouter if a subsequent routing pass is made.
Note that nets containing differential pairs are always fixed and will not be changed by the router.
Routing Style allows you to specify the angle of tracks, either 90 degree (orthogonal), or 45 degree (angled tracks).
Optimising Passes
Optimising Passes are re-routing passes which attempt to reduce the overall track length and via count once the Routing passes are complete. You can use this as a tidy up routine once the Routing Passes have been completed, or if you already have a fully routed board, you can disable the Routing Passes and just use the Optimiser.
You can specify the number of passes that you want. Optimisation can be a slow process, however it can significantly reduce the overall track length and via count. For larger boards, this may be an overnight process.
You can also use the Unlimited (passes) check box, in which case, the Optimiser will continue until the board is 100% complete, or until it is cancelled. We recommend using no more than 20 Optimisation passes as beyond this has little effect on the board.
Fanout Passes
Fanout invokes a number of passes that routes short escape tracks to vias from SMD pads. This is done before the Routing passes. Fanout passes are not necessary in order for the router to function and is more useful as a initial phase before manual routing. You can specify the number of passes that you want. You can also set this Unlimited (passes) but it is recommended to keep this under 20 passes.
Any of the above pass options can be disabled by unchecking the appropriate box. You can also specify Unlimited passes, in which case, the router will continue until the board is complete, or until it is cancelled.

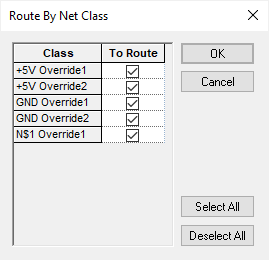
By using the To Route switch, net classes can be selected or deselected for use.
From the Select Classes button, this dialog is used to control the net classes that are selected for routing.
For each net required for routing or not required for routing, a net class must be specified and assigned to the net(s) concerned. Nets which are power or ground, or which have specific properties e.g. high speed or memory etc. should be assigned their own net class.
By using the To Route switch, net classes can be selected or deselected for use.
Costs

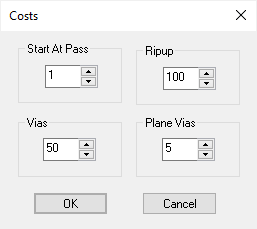
Costs will invoke the Costs option which can change the Cost Factors used by the autorouter. You can use this dialog to change the costs involved with ripping up existing tracks and inserting vias. You can also restart the Autorouter at a specified Pass.
It is highly recommended that unless you know what you are doing, you do not change these settings.
Default Costs
The Default Costs button changes the Costs and dialog settings back to their default values.
How costing works
Every corner, every piece of track, and every via incurs a penalty. The size of this penalty, the ‘cost’ is configurable. The router will always use the lowest cost solution for a route. The cost per unit length ensures that the track is kept as short as practicable. The higher cost per unit length ensures that the tracking will mostly follow the bias direction for the side, except where this would incur higher penalties than going a shorter distance against the bias. Similarly, a high penalty for vias discourages their use, whilst a low one uses more, but may improve the tracking (but be aware that because vias use up more real estate, there’s point of diminishing returns with this). If in a given pass, there’s no solution for a track, the router might put it in, but deliberately introduce an error by crossing an existing track (at very high cost, it must be said, but if no other option exists). On the next pass, the track which was crossed (being already there) will be encountered first. Obviously, this also now has the error, so it will attempt a reroute to reduce this cost. However, the amount of change is also affected because there’s a cost applied to ripping up previously placed track. This cost ensures that the track will use the best diversion route round the error instead of starting from scratch. It’s this iterative error correction process which is at the heart of multi-pass routers, and shows why up to a point, more passes gives better completion. Of course, on the last pass, no errors are allowed, so if no alternative is available, the path is left unrouted. Strong recommendations about the figures for cost can’t be provided, because every design is subtly different, so, whilst the default settings are a good ‘one size fits all’ solution, there will always be room for some improvement on a specific design. The trouble is, it’s only by making small adjustments and seeing what effect they have that you can gain the experience necessary to achieve good fine tuning.
Results and Reports
Check Load Results After Each Pass if you want the display refreshed with the latest results after each pass. This gives you visibility on the progress of the autorouter and allows you to spot any obvious design errors quickly. If you do, you can stop the autorouter, make adjustments to the design and restart.
Check Display Report On Completion if you want the autorouter to produce and display a status report from the router when it finishes.
Dialog Buttons
The Route option will start the autorouter using the values specified in this dialog.
Close will exit this dialog without starting the autorouter but will store any changed values.
Cancel will exit this dialog without starting the autorouter and will not store any changed values.
Stopping The Autorouter
Once the router has started a progress dialog is displayed until it is finished, if the Cancel button is pressed, you can choose to apply the currently available result from the router.
Browse Nets
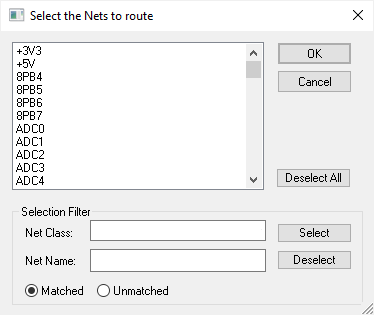
Use the Browse Nets dialog to select the Nets or Net Classes to autoroute. The parameters used for routing will be taken from the settings within the main Auto Router dialog.

Selected Nets
By selecting a net or multiple nets in the design, you can choose this option to autoroute them. The parameters used for routing will be taken from the settings within the main Auto Router dialog.
Saved in Technology
The parameters defined in this dialog are saved to both the design and as part of the technology. As such, they can be exported using Save Technology and loaded into new designs as part of a Technology file.
Router Limitations
Currently, Branch Points are not supported in this version of the autorouter.
Advanced Net Match Spacings and Net Styles are not currently used by the autorouter.
Related Topics
Technology Overview | Save Technology | Using The Auto Router | Grids | Technology - Spacing Rules | Technology - Net Classes