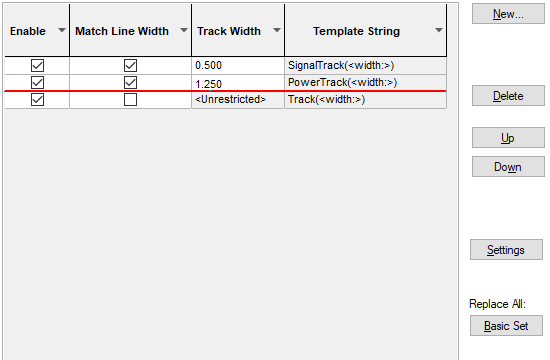
Use this dialog to create and modify naming styles used within the Track styles dialog.
Shortcuts
Menu: Setup
Default Keys: T
Command: Technology
Locating this option
Available from: Setup menu > Technology option > Naming - Track Style Naming tab
Using the dialog
On selection, the Technology dialog opens, select Track Style Naming. The existing naming style for the Technology being used will be presented.

The appropriate rule is found for each Style Naming rule by working down the list until the first match is found. Hence, the order of the rules is important.
Navigation
The buttons to the right side of the dialog are used to navigate the grid, the general common buttons are detailed on the Technology Navigation page.
Use the Settings button to define the Units and Units text for use within the Style Naming. The values on Settings will control how sizes and widths are formatted in the style name itself whereas the units button toggles the sizes and widths displayed.
Replace
The Basic Set button is used to replace all the current contents of your rules with a basic set of rules. These can also be edited once inserted to your own requirements. The Basic Set of Tracks inserts three lines of rules.
Using the editing pane

Match Width
When the Match Width box is selected, this enables you to match the Width field and to define a value in the Less Than or Equal To: entry. As this rule entry specifies, the style width must be less than or equal to what you have entered as the width style. This means different rules can be created based on a Width defined for the Track style.
Template
The Template: entry shows the template that will be used when the rule matches. You can type the template directly, or you can use the Field controls to add system defined fields. More information on how rules work is on the Style Naming Rules page.
Track Style Fields
Track Width -
Is Metric!? -
Is Not Metric!? -
Unit Text -
Insert
Using the Insert button will enter the text shown in the Field Keyword. This has been defined using the Field: and Pre-text: fields below. More information on how these work is on the Style Naming Rules page.
Example Track Style Rules
SignalTrack(<width:>)   Match Width Less Than or Equal To: 0.635
PowerTrack(<width:>)   Match Width Less Than or Equal To: 1.270
Track(<width:>)   Match Width Unchecked, Less Than or Equal To: <unrestricted:>
The Track style will look like this:
SignalTrack(0.500)
PowerTrack(1.270)
Track(2.00)
Export and Import CSV
Use the Export CSV button to export the data in your PCB design into a CSV format file. Using the Export CSV option will provide you with a formatted template ready for you to edit in your own data.
Use the Import CSV button to import data back into the PCB design using a CSV format file.
The data in the file represents a spreadsheet of dialog contents with the data headings along the top row.
Units
The Units button allows you to locally switch between Metric and Imperial units whilst in this dialog. Once the dialog is closed, the units revert back to the original design units. If switching to different units to the design units, the value typed will be converted when you next enter this page.
Related Topics - Technology Style Naming
Hatch Style Naming | Line Style Naming | Pad Style Naming | Text Style Naming | Style Settings | Pad Style Settings
Related Topics
Technology Overview | Hatch Styles | Line Styles | Pad Styles | Text Styles | Track Styles | Export CSV | Import CSV