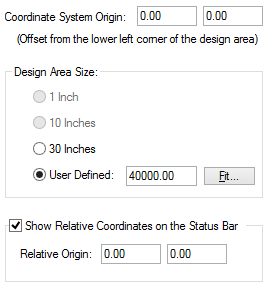
This dialog displays and allows you to modify the position of the design origin, the size of the currently active design area space and the display and position of the relative origin.
Shortcuts
Default Keys: None
Default Menu: Setup
Command: Design Settings
Locating this option
Available from:
Setup menu > Design Settings option > Coordinate System page
Setup menu > Technology option > Design Settings > Coordinate System page
Using the Design Settings Coordinate System Dialog
Selecting Coordinate System reveals this dialog:

Coordinate System Origin
Displays the X, Y position of the Origin for the Design Coordinate System relative to the the lower left corner of the entire available Design Area. Click and edit to change the position. The Coordinate System origin marker in the design will be repositioned to this new coordinate.
Design Area Size
Each of the pre-set area sizes and User Defined entry relate to the width and height of the area, so 10 Inches would be an area of 10x10 inches. Each setting is related (and changes) to the current design units. The Thou/mm button at the bottom of the dialog allows you to locally change the units whilst in this dialog.
When selecting the pre-set area sizes, this means an area of the size relative to the 0,0 System Coordinate Origin will be used. If the design does not fit the pre-set area, the radio button will be greyed out.
The available settings below are shown in both the Imperial and Metric units depending on how you have defined them:
1 Inch - Select to set the available Design Area to 1x1 inch.
1 Centimetre - Select to set the available Design Area to 1x1 Centimetre.
10 Inches - Select to set the available Design Area to 10x10 inches.
10 Centimetre - Select to set the available Design Area to 10x10 Centimetres.
30 Inches - Select to set the available Design Area to 30x30 inches.
1 Metre - Select to set the available Design Area to 1x1 Metre.
User Defined - Select this option to define you own custom Design Area. Enter the size you wish to set the Design Area to (relative to the 0,0 System Coordinate Origin), in. As the Design Area is square, both its width and height will be set to the specified size. If you type a size that does not fit, an error dialog will be displayed to tell you to adjust the size.
Fit - Click to auto fit the available Design Area to the existing extents of the design. This will display the Fit Design Area dialog (shown below).
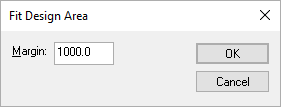
The Fit Design Area Dialog
The Fit Design Area dialog appears when the Fit button is selected. It allows you to specify the size of Margin you wish to allow around the edge of the fitted Design Area. By default, a value of 1 Inch (1000 thou) or 25.4mm will be displayed unless a value has been previously typed in. After entering the required margin size, click OK and the fitted size will be displayed in the User Defined setting. This setting will be applied to the design when you press Apply or OK on the Design Settings dialog.

Show Relative Coordinates on the Status Bar
Click the Show Relative Coordinates on the Status Bar check box to toggle the display of Relative or Absolute Coordinates on the Status Bar.
Relative Origin - Displays the position of the Relative Coordinates Origin relative to the Coordinate System Origin. Click and edit to change the position.
Related Topics
Coordinate System Origin | Reposition Design | Relative Coordinates | Relative Coordinate Origin