Use this dialog to manage the connection to your database. The dialog is invoked by clicking Setup on the Database Bar or the Check Against Database dialog. The dialog is divided into three main sections, each of which is described below.
This option is only available as part of the Pulsonix Database Connection.
Shortcuts
Default Keys: None
Default Menu: Setup
Command: Database Connection Setup
Locating this option
Available from: Setup menu > Database Connection option
Database Connection Configuration File
All the information relating to your connection to a particular database is stored in a Database Connection Configuration (DCC) file. You can set up several of these files if you wish, perhaps if you need to connect to different databases. Use the Open button to open an existing DCC file, and the Save As button to save the current configuration to a different file. By default, the Database Connection will attempt to use the same configuration file as last time when it starts up. If you have write permission to this file, any changes made on this Setup dialog will be written back to that file when you click OK. If you do not have write permission, the various controls on the dialog that allow you to change settings will be disabled.

If you wish to work in a ‘controlled’ environment, so that Pulsonix users cannot modify how the connection to the database is made, then place the configuration file in a location (a network shared folder, perhaps) where you do not have write permission. You will then be able to read the file and load its settings, but they will not be able to change them.
Clicking the OK (No Save) button, rather than the OK button, will apply any changes you have made to your database connection configuration without saving them to the current DCC file. This allows you try out any changes in the Database Bar without affecting other users who might be sharing the same DCC file. If you subsequently wish to save to the DCC file again, it will be necessary to use the Save As option to reselect it.
Connection To Database
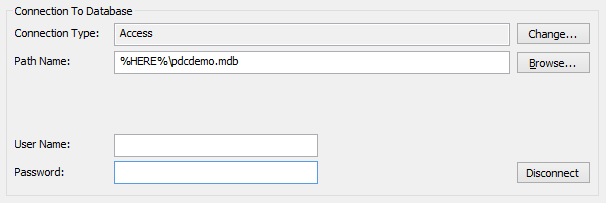
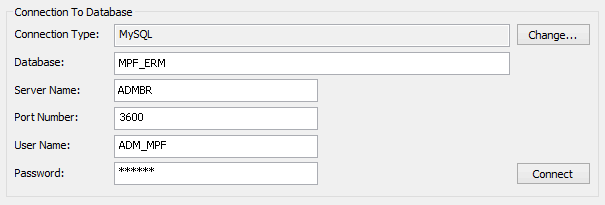
This section describes the database to which you will connect. The actual entries visible on this part of the dialog will depend on the type of database. The two examples below show connections to Microsoft Access and MySQL :


Change - open the Database Type dialog to change the type of database.
Browse - some database types (Microsoft Access, for example) will reference a specific file. Use this button to browse to the location of that file.
Server Name - the name (or IP address) of the machine on which the database server is running.
Port Number - the TCP port number of the database server.
User Name and Password - the user name/password to be used when connecting to (logging into) the database. If no user name and/or password is required, just leave the box empty.
DSN - the Data Source Name (DSN) to connect.
Conn String - the user defined connection string, for those database connections/types that are not specifically provided for in the Database Type dialog. You will need to specify the complete ODBC connection string to hook up to your database; here is an example that might be used for connection to a MySQL server:
Driver={MySQL ODBC 3.51 Driver};Option=3;Server=dbserv;Port=3306;Database=MRP;User=MRPUSR;Password=;
Connect and Disconnect
To connect to the database if you are not already connected, click the Connect button. This will use the settings shown on the dialog, the configuration file is not re-read at this point. If the configuration file has been changed by someone else and you want to Connect using the latest settings from that file, you will need to click Open and reload the configuration file.
Once you have connected to the database, the Connect button becomes Disconnect, and clicking the button will disconnect you from the database.
Database Tables and Mappings
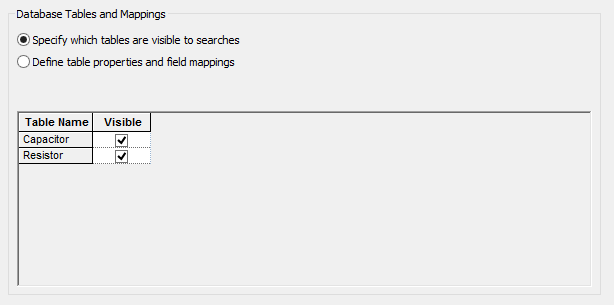
Once you are connected to a database, this section becomes available, and allows you to specify which of the tables in the database are ‘visible’ when searching using the Database Bar and for each table which fields are visible and to which attributes they will be mapped.
The first part is simple; the list will show all the tables that the application has been able to find in your database. Just uncheck the box alongside any table that you do not want to be visible when searching for components. The default setting is for all tables to be visible, so to start with all the boxes will be checked.

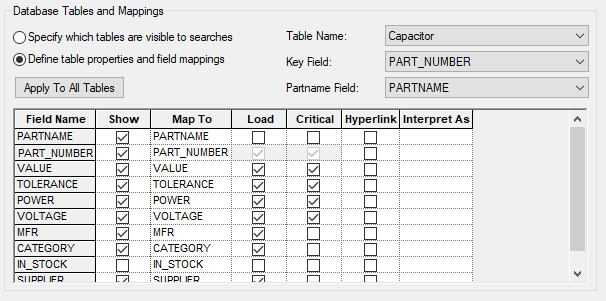
As well as deciding which tables are to be visible, you can also specify how each field in a particular table is to be handled.

Table Name - the name of the database table to set up.
Key Field - this is the name of the database field that holds the values that uniquely identify each different component in your database table. This might be a part number, or perhaps a supplier order code. It is this field that provides the link back to the database record from the component once it has been added to the design.
Part Name Field - this is the name of the database field that holds the name of the Part in your Pulsonix library. The value in this field will be used to retrieve the appropriate part to be added to your design when you choose a particular component record from the database. This field may be the same field as the Key Field, in which case the mapping between the component in your database and the Pulsonix Parts Library will be one to one, but it does not have to be. If it is different, it is best to set the field as Load= false in the grid as if loaded it will merely echo the component’s Pulsonix Part Name and will be included in automatic search criteria, restricting them to records of only that part name.
Field Name - this column in grid lists the names of all the fields in the currently selected database table.
Show - check this box to show this field in the ‘search results’ grid on the Database Bar.
Map To - this is the name of the attribute in which this database field should be stored. The default setting is for them all to be mapped to the same name as the field in the database itself, but you can choose to enter different names if you wish.
Load - check this box to load the value of this field into the corresponding attribute on components as they are added to the design. Note that the field selected as the ‘Key Field’ will always be set automatically to Load=true and you will not be able to deselect it.
Critical - check this box to mark this field as one which must have the same value on the component as it has in the database. Note that the field selected as the ‘Key Field’ will always be set automatically to Critical=true and you will not be able to deselect it.
Hyperlink - check this box to specify that this field holds the name of an external document. You will then be able to access referenced documents directly from the ‘search results’ grid on Database Bar.
Interpret As - Allows additional meaning to be attached to textual database fields for the purpose of filtering and sorting. Unit and magnitude information specified alongside numeric values will be correctly interpreted when comparing and matching different items. (See below for more details).
When you have set up the right mappings for the first table, if all your tables have the same ‘structure’ you can save time by clicking Apply To All Tables, which will copy the settings for the current table across to all the others.
Another shortcut you might find useful is one that allows you to set all the cells in a column to the same setting. For example, to set all the fields to Load=true, check the box on the first one, right click on it and choose Apply To Entire Column.
‘Interpreting As’ Values

A blank Interpret As entry indicates that it is not in use by the field. This is the default setting for existing users. If you do not wish to use this new feature, do nothing and leave it blank.
A numeric value is identified as one that begins with a digit and may have additional units information appended to or embedded within the numeric digits.
Using Interpret As allows searches such as ‘Value between 5K and “10K’ to be conducted which as well as finding resistors with values such as ‘5K’ and ‘7.5 k’, will also find those with values such as ‘8250’, 5500R, 6K5 and 0.0095M.
Sorting on a field with an Interpret As setting will order items according to their interpreted value rather than in the default alphabetic order.
Below shows the effect on the sort order, setting a Value field to Interpret As Capacitor Value. The column to the left shows the standard alphabetic order while the column on the right shows the ‘Interpret As’ ‘Capacitor Value’ order.
| Standard Alphabetic Order | ’Interpret As’ ‘Capacitor Value’ order | |
|---|---|---|
| 0.33uf | 10pf | |
| 100nf | 22pf | |
| 10pf | 330pf | |
| 1uf | 100nf | |
| 22pf | 0.33uf | |
| 330pf | 1uf |
The provided Interpret As types that may be chosen from the dropdown list are: Resistor Value, Capacitor Value, Inductor Value, All Values or Number.

Resistor Value’ will recognise values such as 10, 10R, 10K, 10M, 1R5, 1K5.
‘Capacitor Value’ will recognise values such as 10mF, 10uF, 10nF, 10pF, 4.7u, 470p, 101, 102, 4n7.
‘Inductor Value’ will recognise values such as 10mH, 10uH, 10nH, 10pH, 101, 102, 3N3, 33N, N33.
All Values is intended for when a single table contains a variety of component types and will recognise any of the previous three types of values. By using an appropriate unit type in the search term the results can be filtered to the required type, e.g. “Value < 5K” will find all items with a resistor type value that evaluates to < 5000.
Number will interpret all recognised numeric values as an unmodified number and will disregard any additional units information. This is useful for simple numeric ordering.
All Interpret As types will recognise unmodified numeric values and will use them in same context with other units information.
Restricting the Database Tables that are accessed
By default, when a database is connected to Pulsonix all the tables it contains will be accessed, even those subsequently set as not visible. Under certain circumstances it may be desirable to exclude a particular database table completely so it is not accessed by the Database Connection at all. This can be achieved by adding an Exclusions section to the DCC file as described in the Pulsonix Database Connection Users Guide.
Alternative ‘Map To’ Attribute for Partname
This provides an alternative means of mapping the database records to Parts in the Pulsonix library and can be useful where your database does not contain a field to map to a Pulsonix Partname, but your Pulsonix Parts have an attribute that uniquely identifies the appropriate database record.

NOTE: For the Database Bar to be able to use this alternative mapping, the specified attribute MUST also be added to the list of indexed attributes using the Part Library Manager Index option.
As an example, consider a database whose tables have a unique key field called ‘Article_No’ but no field equivalent to the Partname for the parts contained in the Pulsonix library. However each of the parts in the Pulsonix library, in addition to their Partname, also have an attribute called ‘Part_Code’ which contains a value equivalent to the ‘Article_No’ field in the database.
The field mappings entry for the ‘Article_No’ field should have its Map To value set to ‘Part_Code’. By also setting Alternative ‘Map To’ attribute for Partname to ‘Part_Code’, you indicate that in the absence of a Partname mapping, records in the database tables should be linked to Pulsonix parts by mapping the ‘Article_No’ to the Pulsonix ‘Part_Code’ attribute. The Key Field for each table must still be set to a uniquely identifying field, but in most cases, as with this one, will be the same field as mapped to the attribute, i.e. ‘Article_No’. As we have said, there is no database field to map to the Pulsonix Partname so the Part Name Field should be set the same as the Key Field, again ‘Article_No’ in this case.
Now, when a database record is selected for adding to the design its ‘Article_No’ value will be used to locate the equivalent Pulsonix part by matching its ‘Part_Code’ attribute.
Related Topics
Pulsonix Database Connection | Database Bar | Database Type | Database Check