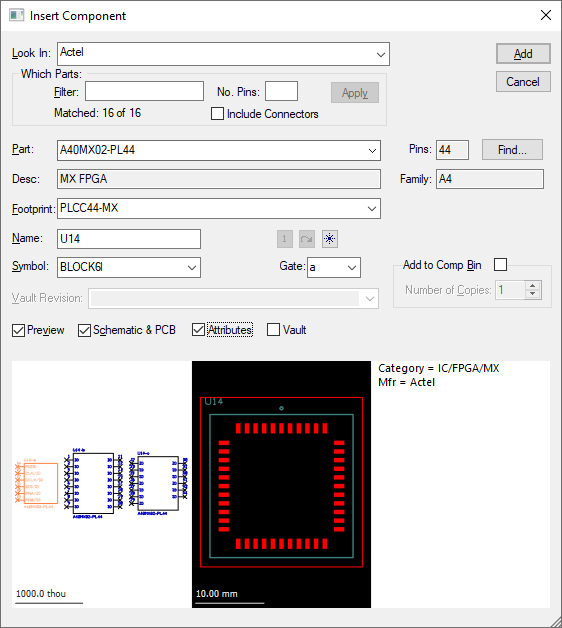
Use this option for adding new components to a PCB design from a library.
Shortcuts
Default Keys: None
Default Menu: Insert
Command: Insert Component
Locating this option
Available from: Insert menu > Component option
How To Insert A Component
- Select the Component option on the Insert menu, or use one of the above mentioned shortcuts.
- Setup the Insert Component Dialog:-
- Set which parts library you wish to add from. A list of part names will appear in the dialog. Use the filter to reduce this list to the parts that you are interested in.
- Choose which part you wish to add from the list or use the Find button to locate the part based on more advanced criteria.
- Select which of the part’s footprints you require (if more than one available).
- Optionally, preview the footprint (and equivalent schematic symbol if required) to check if it is the correct one.
- Change the component name (if the default provided is not suitable).
- Choose to add the part (or a number of copies of it) straight to the ” unplaced” Component Bin , or to add a component interactively into the design.
- Use the Add button to add the component(s) to the design. If adding to the bin then you are returned immediately to the dialog, else follow these next steps.
- Using the mouse, move the component to the desired position and click to place it into the design.
- Continue to place components using the same part. Each next component’s name is auto incremented to the next free name in the design. Press the Esc key, or cancel using the shortcut menu, to return to the add component dialog.
How To Use The Insert Component Dialog

Look In
Use this to choose a parts library to search for the required part. The library list is set up in Library Folders in the library manager. Two special entries exist:
Use [All Libraries] to choose from parts in all of the parts libraries. If the same part is in more than one library, the first found will be used, so library order is important.
Use [Current Design] to choose from the parts already added to the design.
Which Parts
Use the Filter box to enter a string containing the ”*” or ”?” wildcard characters to filter the list to only matching names e.g. “74LS*“. Use the No. Pins box to limit the matching parts to those of a set number of pins (blank means any pin count). press Apply to alter the list of parts names accordingly. The number that matched the filters is shown in the dialog.
Part
This listbox contains the part names to choose from. Select the one required. The number of pins on the selected part is displayed in the Pins box.
Pads
This is a non-editable field that informs you as to the number of pads that selected part contains.
Desc (Description)
Displays the full description of the selected part.
Find
If you do not know exactly the name of the part to use but know some of it, or know the values of some of its attributes, use the Find button to locate it. The Find dialog will be displayed allowing you to search all libraries in the library folders for the required part. This dialog allows you to search using several different criteria. You can search by part name, including wildcard characters. You can search on the number of pins on the part. You can also search for parts containing a particular named attribute, again using wildcard characters on the value. A list of parts matching the search criteria will be shown in the dialog. Selecting the required part will change the Insert Component dialog to show the chosen part.
See the help section Find Library Item for details on how to use the Find dialog.
Family
Displays the name of the part family that the selected part is a member of. If the part is a member of a family it can be changed to any of the alternate family members easily using the Next Part Alternate command.
Footprint
This shows the alternative footprints that the chosen part can use. Select the footprint required.
If Footprint Rules have been defined and Use Rules to Auto-Select Footprints option enabled then the appropriate footprint will be pre-selected.
Name
Enter the unique name for the component. The default name is created by adding a unique number to a stem taken from the part. This default name will not already exist in the design.
Preview
Use this to optionally display what the component will look like when added to the design.
Schematic & PCB
If Preview is enabled, this switches between a PCB Footprint preview and a dual preview allowing both the Schematic Symbol and PCB Footprint to be reviewed.
Attributes
As well as previewing Symbols for the Part, you can also preview Attributes associated with that Part by selecting the Attributes check box. If the attribute has been marked as a hyperlink, then this will be highlighted as a coloured and underlined link that can be clicked on. This will then open the Hyperlink in the associated viewer, i.e. Web browser, PDF file, Word doc, etc.
Add To Comp Bin
Use this to add the component(s) to the Component Bin. These components can then be dragged from the bin into the design at a later stage. Using this check box, you can quickly build up a bin of all components required for the job, suitable for using Autoplace to position on the board later. The Number Of Copies box allows you to add multiple parts to the bin in one operation.
Vault
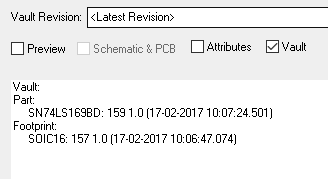
Checking the Vault button will show the Vault IID and Version reference information for the Part, Symbol and Footprint, alongside other enabled Preview information.
If the Vault is in use, Look In will additionally include Vault library entries. Each Vault folder that contains part items will be listed and the special entry [Vault Only] allows all parts from the Vault to be exclusively chosen.
Also, additional controls are shown on the dialog, below the Symbol field.

By default, Vault Revision shows the
Interactively Positioning A Component
The Component will normally not be mirrored. However, it will be mirrored if you had a mirrored component selected when you entered the dialog. There are a number of ways to define the default mirror state for a newly added component. When editing the footprint it is possible to define the mirror state. You can also define the default side using Component Placement Rules. Finally, you can set the default Side for Through-hole or Surface Mount components.
Whilst using the mouse to position the component you can use the shortcut menu (shown below) to change its angle and swap to the other side of the board, amongst other things. This is explained in detail in the Move operation.

Use Next Footprint to change the footprint used by this component to the next footprint defined in the part. This option is only available if the part has more than one footprint.
Use Auto Footprint to check the component’s footprint against the current set of Footprint Rules and if necessary replace it with the appropriate alternative. This option is only available if the part has more than one footprint and the design has Footprint Rules defined.
Use Next Alternate Part to change the component to use the next part that is a member of the same part family. This option is only available if the part is a member of a family.
Use Insert Multiple Items to switch from adding a single component to adding multiple copies of the selected part at the same time. An Insert Multiple Components dialog will be displayed for you to specify how many components in each direction and the gap between them.
Use Next In Sequence to increment the component name to the next free name not used in the design.
Use Cancel Insert Component to cancel the current component being added and return to the dialog.
or
Use Exit Mode to cancel the current component being added and exit back to Select Mode.
or
Click to drop the component at the required position.
Related Topics
Component Bin | Find Library Item | Insert Multiple Components | Libraries | Autoplace | Move