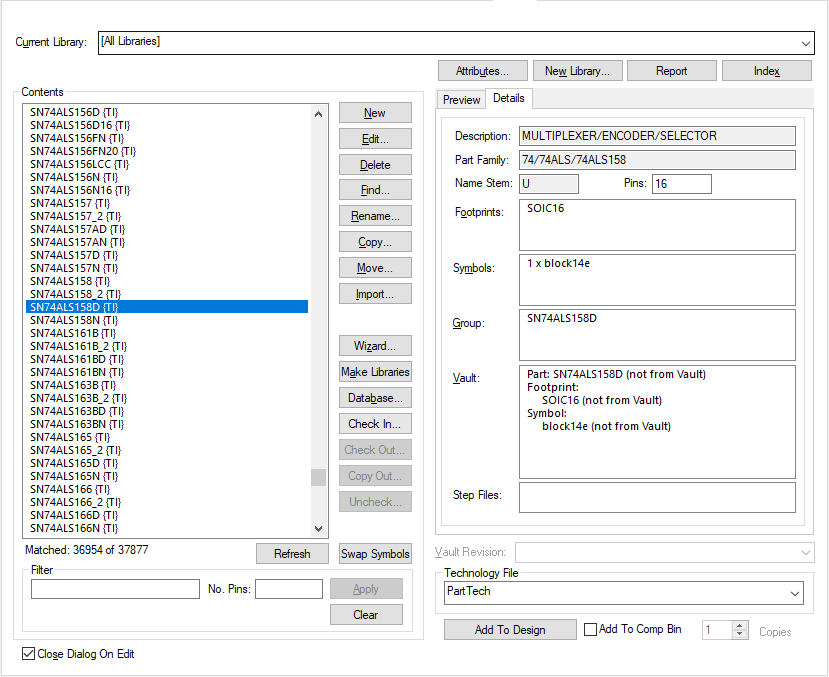
This page of the Libraries dialog provides access to Parts libraries, allowing you to view and edit the library contents.
How to Use This Dialog

Current Library
The top part of the dialog allows you to choose which libraries to view. The drop-down list will include all the library files found in the folders you specify on the Folders page.
Any library files that are set on the Folders page as ‘Disabled’ will not appear in the drop-down list. The
list will only include ‘Enabled’ libraries, and the special entry
If the Vault is use, the drop-down list will additionally include Vault entries. Each Vault folder that contains part items will be listed and the special entry [Vault Only] allows all parts from the Vault to be exclusively viewed.
Attributes
The Attributes button runs the attribute editor, which allows you to edit the attributes on chosen parts. The Edit Attributes For dialog is presented to choose all the listed Parts in a library, or just the currently Selected ones.
New Library
To create a new library, press the New Library button. A standard File Browser dialog will be displayed. Enter the name of the new library file and press OK. If you have chosen to create your new library file in a folder which is not in the list of folders, an additional dialog is displayed which will ask you to choose whether or not this folder should be added to the folder list.
If you choose not to add a newly chosen folder to the list of folders, your new library will not appear in the list of ‘known’ libraries, and therefore any items added to that library will not be available either here in the Libraries dialog or when inserting new items into designs.
Report
The Report button opens up the Library Reports dialog from where you can produce different reports and lists of the selected Parts libraries.
Index
The Index button causes the library index to be rebuilt. The index is used by the system for searching libraries without having to read the entire contents each time. This is done automatically for you and should only be used if you wish to update the attribute list within it; the index only stores a limited set of attributes so that it is fast for access.
When the Index button is pressed, you are presented with the Regenerate Part Library Indexes dialog. You can choose to nominate attributes to be added to the index for use by the Part Browser for example.
Contents
The Contents area of the dialog shows the items contained in the library (or libraries) selected in Current Library, sorted in alphanumeric order by Library first and then contents within that library.
Centre Console Buttons
The buttons down the centre of the dialog to the right of the Contents list provide the options needed to modify the library items. Most operations can be performed on one or more items. These buttons will be enabled or disabled depending on whether or not any of the items are selected.
| New | Create a new part |
| Edit | Edit existing parts |
| Delete | Delete a existing parts |
| Find | Use the Find Library Items dialog to locate Parts by searching on fields within the Part |
| Rename | Rename a part |
| Copy | Copy parts within or between libraries |
| Move | Move parts within or between libraries (i.e. Copy, but Deleting the originals) |
| Import | Import parts from libraries or designs. Simply Open the data file. Many different formats are supported. |
| Wizard | Use the part wizard to simply create complex parts |
| Make Libraries | Make a new library from the selected parts and also create libraries for the footprints and symbols that they use. |
| Database | If you have the Database Connection (PDC) product [cost option], this button will give you access to the Database Transfer dialog from where you can manage data between the database and your Parts library. |
| Swap Symbols | Change Symbols in a Part based on their name |
| Refresh | Refreshes the list of sorted items |
Additionally, if you are using the Vault, the buttons described below will also be shown. Whether these buttons are available is dictated by the vault status of the selected item. For example, the Check Out button will only be enabled if the item is from the vault and not already checked out.
| Check In | Book a new or edited part into the vault |
| Check Out | Get an editable copy of a part from the vault |
| Copy Out | Get a read only copy of the part from the vault |
| Uncheck | Cancel that a part is checked out from the vault |
Part Content Filter
To help in locating the items you require, a Filter can be applied to select those items with names which match a wildcard pattern and/or a specified number of Pins.
Press the Filter Apply button to update the contents list.
Use the Clear button to clear the contents of the Filter.
Preview tab
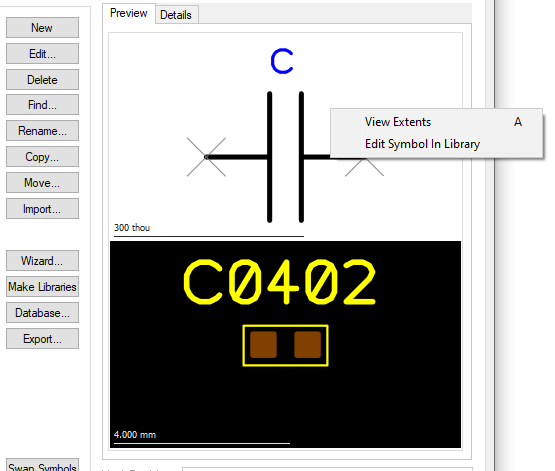
The Preview tab is used to preview the Schematic symbol gates and Footprint used for the Part. Within each preview window, you can use basic Zoom in and Zoom out features using the mouse or shortcut keys.
You can right click in either of the preview windows and from the context menu, can reset the view using View Extents, and you can use the Edit Symbol In Library option to edit the symbol. If your Part has multiple different gates, then each gate will open in a separate Symbol editor window.

Details tab
The Details tab displays the basic details for the item currently selected in the list. Details will only be shown when a single item is selected in the list. The basic details of the part are shown, allowing you to browse through the libraries without having to open each part to find the information you need.
Basic Part details are shown as information, none of these fields are editable. Fields shown are for Description,Part Family,Name Stem and number of Pins for the footprint.
The Footprints list shows the PCB footprint symbols used by the Part. This list is shown in order as defined within the Part with the default footprint show at the top of the list.
The Symbols list shows the schematic symbols used by the part. Where the part has more than one gate, the names of all the symbols used will be shown. If the same symbol is used for more than one gate, its name is only shown once with a counter showing how many gates use that symbol.
The Part Group shows you the names of the groups that are defined for a group definition. If no group name has been used, it will show you the Part Name.
Part Groups are used to save time in creating similar parts, for example, Resistors. Groups are created by making a number of different part names reference the same basic Part. This is described in more detail in Understanding Libraries.
If the Vault is in use, the Vault section shows the vault details for the part and its footprint and schematic symbol.
If a STEP File has been defined for the Part, the STEP Filename with be shown in this field.
Vault Revision
If you are using the Vault and the item currently selected in the
list is from the vault, Vault Revision will show which version of the vault item is currently displayed.
By default, the
Technology File
When editing parts, the Technologyfile currently selected in this drop-down list will be used. The technology defines the available attribute names and pin types.
Add To A Design
If you have a current PCB or Schematic design open, and a single Part name is selected in the Contents list, you can use the Add To Design button to interactively add the part to the design. If you check the Add To Comp Bin box, you can also add a number of copies of the chosen part to the designs’ component bin. In this case the button changes to Add To Design Comp Bin.
Close Dialog On Edit
If this box is checked it will cause this dialog to close when you edit the item. If left unchecked, the dialog remains open allowing to to open other items, or to switch to other pages of the dialog to view or edit items of a different type.
Related Topics
Folders | Libraries dialog | Understanding Libraries | Regenerate Part Library Indexes | Part Editor | Part Wizard | Part Technology | Attribute Editor | Library Reports | Database Transfer | Find Library Items