This page allows you to change how the application arranges separate instances across multiple monitors or on a single large monitor.
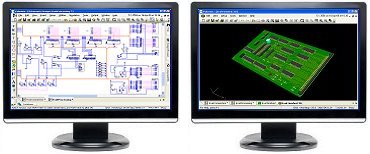
Working with dual copies of Pulsonix allows you more flexibility in carrying out some of your design tasks by making best use of available hardware resources. If you have two displays, you can arrange things so you can carry out your PCB work on one screen, and your Schematic work on the other, and cross probe between them.
Shortcuts
Default Keys: O
Default Menu: Tools
Command: Options
Locating this option
Available from: Tools menu > Options > Multi-Screen > page
Using this dialog

Using the Tear-Off Windows option
Selecting this option will enable Tear-Off Window support. The program must be restarted after toggling the setting in order for the changes to take effect.
Tear-Off Windows are used as an alternative to Multi-Screen. Using Tear-Off Windows, you can make new windows that are independent from the main Pulsonix window by “tearing off” a tab. Using Tear-Off Windows, it is possible to have more than two windows, unlike Multi-Screen, allowing greater use of systems that have more than two displays available.
Tearing off a window
Tabs can simply be dragged off the current window to create a new torn-off instance of Pulsonix which contains the tab. This can be done as many times as required, so long as there is at least one tab in each window.
Reinstating a window
To reinstate a tab, drag the tab and release it onto the desired window. During this time, the desired window will be highlighted in blue to indicating the window can be reinstated.
Tab groups
Much like tabs in a browser, a tab group is a collection of views than can be switched between by selecting the tab of the view you wish to bring to the front.
When a new design or page is opened, its view will be put into an existing tab group.
If there is more than one tab in a tab group, the tabs can be separated to create a new tab group. This is achieved by either dragging and releasing a tab onto the scroll bar section at the edge of a view (note that a blue highlight should appear to indicate that it is available), or by right-clicking a tab and selecting New Horizontal/Vertical Tab Group.
Tear-Off Window Details
Each torn-off window has a unique menu bar, toolbars and status bar. The main Pulsonix window is the only window with dock bars available.
Tear-Off Windows uses a different mechanism for remembering opened designs. In Tear-Off Windows mode, the exact positions of each design are saved into the registry and loaded when Pulsonix is started again. Note that the Tear-Off Windows mechanism uses a different set of “remembered” designs and, as such, when toggling Tear-Off Windows for the first time you will notice that no designs are initially opened.
The ‘Windows’ commands for cascading, tiling, and arranging windows are not available when Tear-Off Windows mode is enabled. This also means the small buttons for minimising, expanding, and closing a view are not available to the top-right of the window.
When Tear-Off Windows mode is enabled, windows are sized as required so the only option required is the Close button. This is now available on the tab as a button labelled X.
Using the Multi-Screen option
How it works
Once this option is enabled, Pulsonix will work with two copies of the application running at the same time, sharing out the work. The two copies work independently, each with their own set of menus and toolbars, but co-operate where they need to share information or ‘talk to each other’ in some way. You can opt to place Schematic files in one window, PCB files in another, and also decide where you want to work on other files such as library items.

Some commands work on more than one design, so some ‘co-operation’ between the two instances is needed. This is all managed by the application, passing information between them, as needed. For example Cross Probing between Schematic and PCB will work just the same as it does when working in a single application; select an item in your Schematic, click Cross Probe, and the corresponding item in the PCB will highlight.
In a few cases a command may need to access the actual design data that is open in the other window. For example Synchronise Designs works on a Schematic & PCB pair, so if the two files in the pair are open in separate instances, there may be some saving and reloading of designs going on as part of the command. Once again, all this should happen automatically.
The positions and settings of popup dialogs (Colours, Technology, etc) will be saved and restored for each application separately. When first moving from single to dual screen working the default positions will be those from the original single screen setup, but after that they will be saved separately.
Working on a single monitor
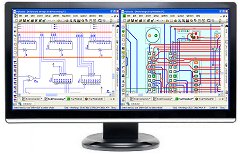
Although generally used across dual monitors, this feature can also be used if you only have a single display. The process works just the same, as its up to you where you position the windows to achieve the best results. For example if you have a high resolution wide screen display, you may wish to arrange the two application windows side by side like this:

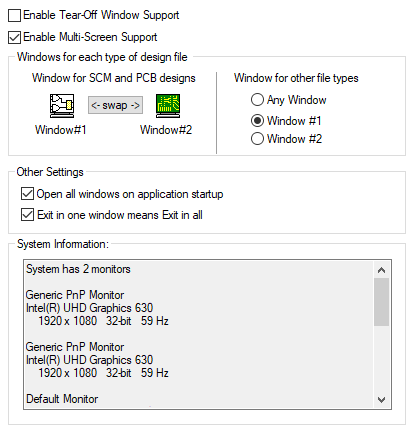
Check the Enable Multi-screen check box to turn on multi-screen operation. With this enabled, two instances of the application will work together to arrange your files so you can easily work on Schematic designs in one, and PCB designs in the other. Each instance will have its own menus and toolbars and work independently, but will share information when they need to.
Windows for SCM and PCB designs
This setting shows which window is used for each design type. Although it does not really matter which way round they are, instance #1 is the one that will be launched first if you run Pulsonix with no designs open.
The small picture shows which design type will be displayed in which instance. To swap them round, simply click the ‘swap’ button.
Windows for other file types
As well as Schematic and PCB designs, Pulsonix is of course used to edit all your library items (Parts, footprints, etc). You can choose where these should be opened for editing. You can choose either of the two specific program instances, for example you may wish to always edit library items in the same instance as your Schematic designs, or you can allow them to be opened in the instance in which the editing ‘action’ takes place.
Other Settings
Open all windows on application startup
With this checked, both instances of the program will be started when you launch Pulsonix. With it unchecked, launching Pulsonix will either start instance #1 (if no designs are open), or if you are opening a particular design file then it will launch the instance for that type of file.
There is no recommended setting for this switch, it simply depends on how you prefer to work. The default setting is On.
Exit in one window means Exit in all
Check this box to make both instances close down if you close one of them. This makes them work more like a ‘pair’, but again it is simply down to how you want it to work.
The default setting for this switch is On.
System Information
This panel shows any information relating to your system display configuration that the program has been able to find out.
Other Options Tabs
| General Options: | Design Backups | Display | Edit Shape | File Extensions | Find | Folders | General | In-Place Names | Macros | Move | Pan & Zoom | Resolve Net Names | Select | Synchronisation | Tooltips | Warnings |
| PCB Options: | Edit Track | Interaction | Online DRC | Track Length Limits |
| Schematics Options: | Edit Connection | Interaction | Online ERC |
| Footprint Options: | Edit Breakout |